Document fingerprinting is a unique type of sensitive information type (SIT) in Microsoft 365 that creates a digital fingerprint from a standard form or template document, allowing you to automatically detect and protect similar documents across your organization. It is a method used to identify and protect documents based on their unique structure rather than their specific content.
Table of contents
How document fingerprinting works.
When a template is uploaded to Microsoft 365, the system creates a digital fingerprint by analysing its structural features like text positions, field layouts, formatting styles, and headings. This signature acts as a reference pattern that Microsoft 365’s Data Loss Prevention (DLP) engine uses to detect similar documents across the environment. Even if the content changes, like in a filled-out purchase order versus its blank template, the same structural fingerprint allows the system to consistently identify and protect sensitive document types based on their format rather than specific wording.
How Document Fingerprinting Differs from Other Detection Methods.
Pattern-based Sensitive Information Types use regular expressions and keyword matching to identify specific text formats like credit card numbers or the word “confidential.” However, they cannot recognize a document by its overall structure, so while a completed tax form might contain sensitive details, pattern-based rules would only detect the individual data elements, not the document itself.
Exact Data Match (EDM) detection relies on comparing hashed sensitive data, such as employee IDs or customer lists, against stored databases of real values. This method is highly accurate but depends on maintaining up-to-date databases. In contrast, document fingerprinting secures documents based on their structural templates, without requiring knowledge of the actual data entered.
Trainable Classifiers uses machine learning models trained on large datasets to recognize document types and contexts. it is powerful, but it needs continuous training. Document fingerprinting offers faster deployment, it only requires uploading one template to begin protecting all documents of that type.
Creating Document Fingerprints: Step-by-Step Guide
Implementing document fingerprinting in Microsoft 365 requires careful planning and execution. The processinvolves several key phases, each critical to success.
Preparation Phase.
Begin by identifying which document templates require protection. Select representative templates for fingerprinting. The template should clearly represent the standard format without excessive variations or unusual content. If your organization uses multiple versions of a form, you may need to create separate fingerprints for each version or select the version that best represents all variations.
Prepare your templates in supported formats. Microsoft 365 accepts various file types for fingerprinting, including Word documents, Excel spreadsheets, PDF files, and plain text documents. Choose the format that best represents how users will work with the documents in practice.
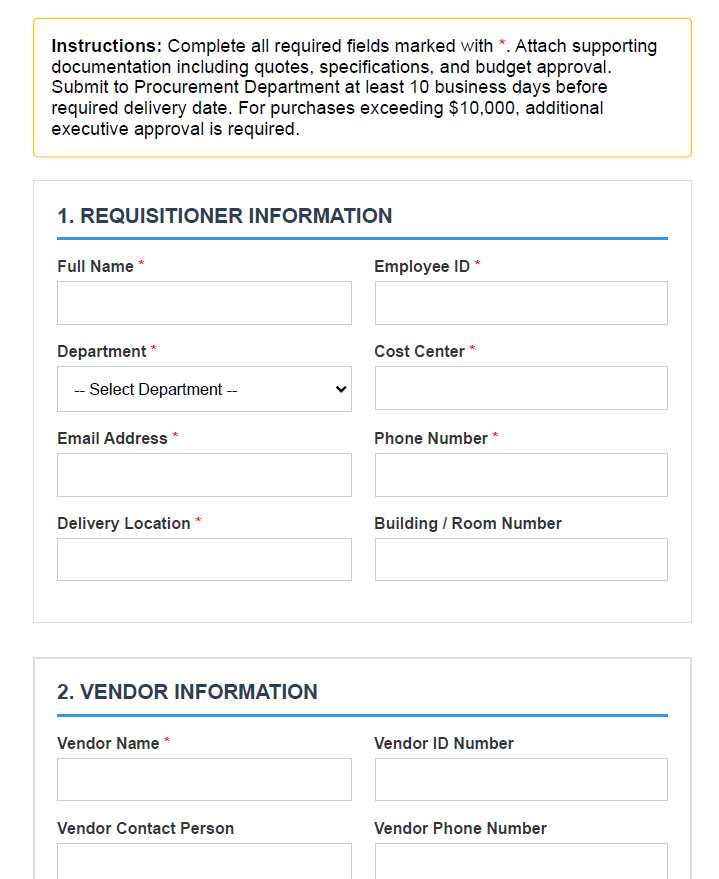
For demonstration purpose, I am using a purchase order form that has the below fields as reference.
Creating the Fingerprint.
Navigate to https://purview.microsoft.com/ –> Solutions –> Data Lifecycle Management –> Classifiers –> Sensitive Info Types and select Create Fingerprint based SIT

The new fingerprint SIT page will pop up
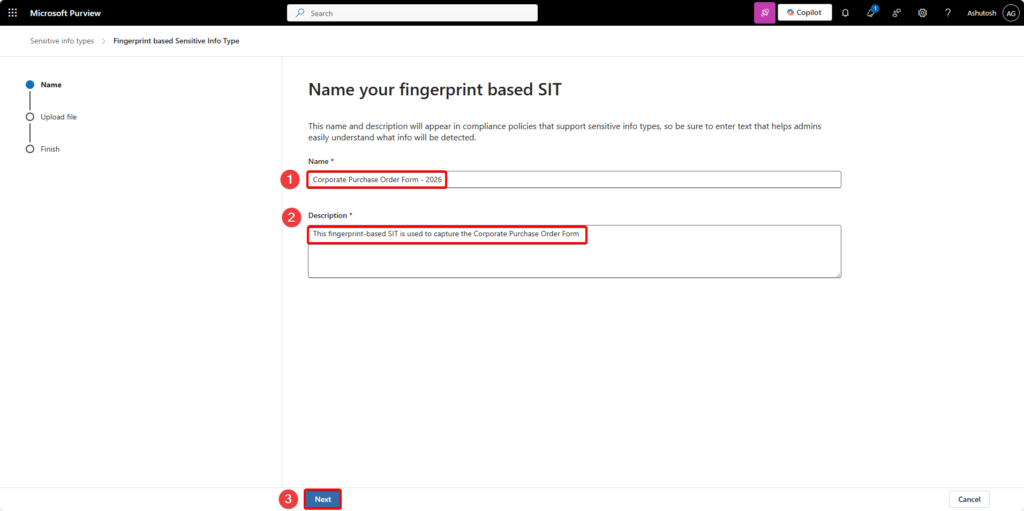
Provide a descriptive name for your sensitive information type. Choose a name that clearly identifies both the document type and its purpose. For example, “Corporate Purchase Order Form – 2026” and select Next.
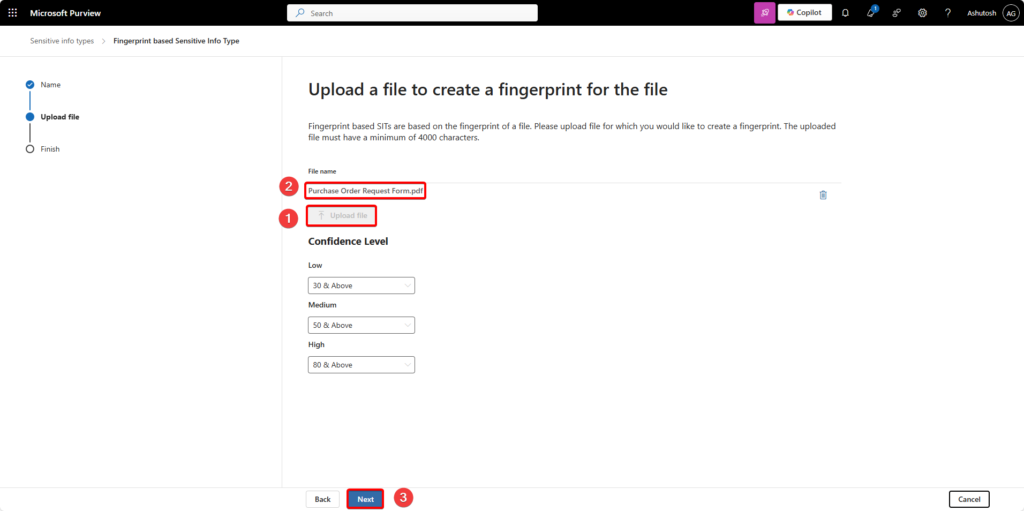
Now select Upload file option and upload the reference file and select the confidence level and then select Next.
Partial matching and exact matching control how strictly Microsoft Purview compares documents to your fingerprinted template.
Partial matching.
When configuring partial matching for a fingerprint-based SIT, you set:
- a confidence level (Low, Medium, or High), and
- a minimum match percentage (between 30% and 90%) it defines how much of the document’s text must align with the fingerprint.
- Low confidence: Captures the broadest set of matches, returning low, medium, and high confidence results. It produces the fewest false negatives (i.e., it rarely misses true matches) but the most false positives
- Medium confidence: Balances accuracy and coverage, returning medium and high confidence matches. It produces a moderate number of both false positives and false negatives.
- High confidence: Applies the strictest criteria while still using a percentage threshold. It returns only high confidence matches, resulting in the fewest false positives but the most false negatives (it may miss some true matches that differ slightly from the template).
Exact matching.
For exact matching, you configure the high confidence level to Exact instead of a percentage. In this mode, only documents that have essentially the same text as the fingerprinted template are detected. Even small deviations in the text cause the document not to be identified as a match, making it suitable for highly standardized, sensitive forms where precision is critical.
For demonstration I am not changing the confidence level setting of this fingerprinting based SIT.
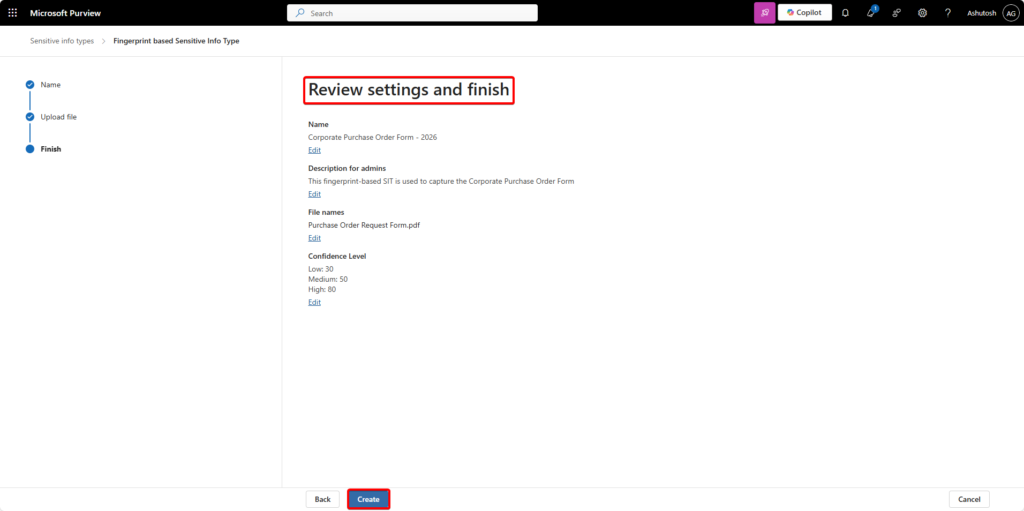
Review the settings of the fingerprint based SIT and select create.
Key Takeaways
- Document Fingerprinting creates a digital fingerprint from standard documents to automatically detect and protect similar files in Microsoft 365.
- It identifies documents based on structural features rather than specific content, enabling detection even if the content changes.
- This method differs from traditional detection methods like Pattern-based Sensitive Information Types and Exact Data Match, which rely on content or hashed data comparisons.
- To implement Document Fingerprinting, identify templates requiring protection and upload them in supported formats within Microsoft 365.
- Configuration options include partial and exact matching, allowing users to set confidence levels and matching percentages for effective document identification.
In the next article we will discuss on how and in which service the document fingerprint can be used and integrated with.