This article will show the detailed steps of configuring the pfSense firewall. we will configure different services and firewall rules for multiple network interfaces to allow and block requests.
- Part 1 – Overview and Network Configuration.
- Part 2 – Installing pfSense Firewall on Virtual Machine.
- Part 3 – Setup Kali Linux on Virtual Machine.
Table of contents
pfSense Setup Wizard.
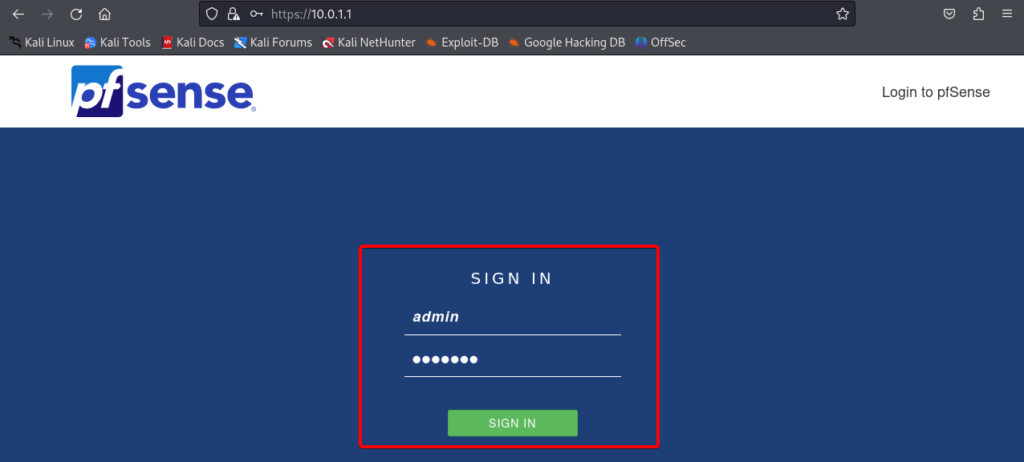
To login into pfSense web portal, open Kali Linux web browser and type the ip address https://10.0.1.1 in the address bar.

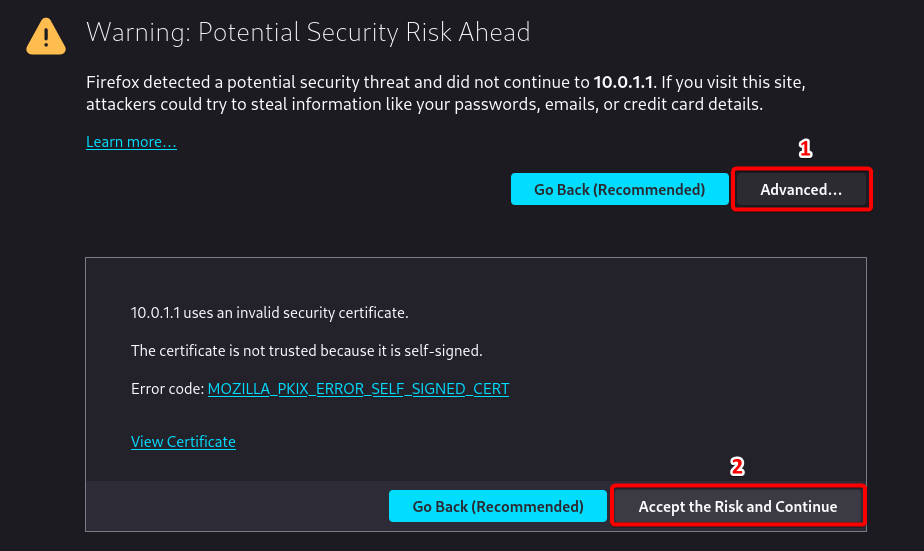
To accept the security warning, select Advanced and then select Accept the Risk and Continue.
Use the default username: admin and password: pfsense
On the welcome to pfsense software page, select next, On netgate 24/7 global support page information select next.
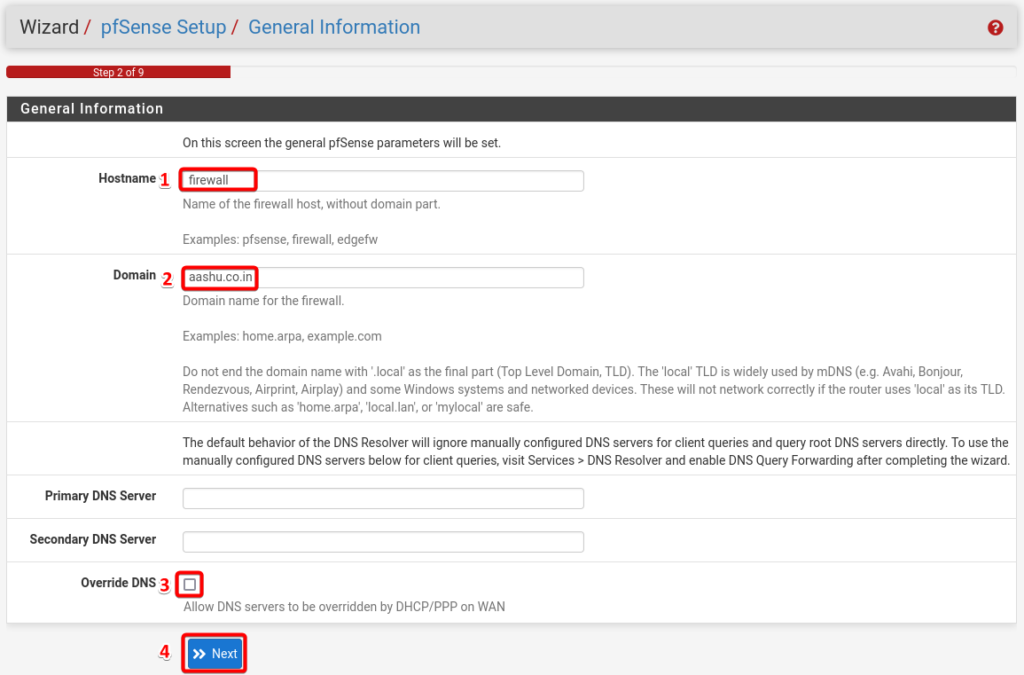
Enter the Hostname and Domain, make sure you uncheck the Override DNS option and select next.
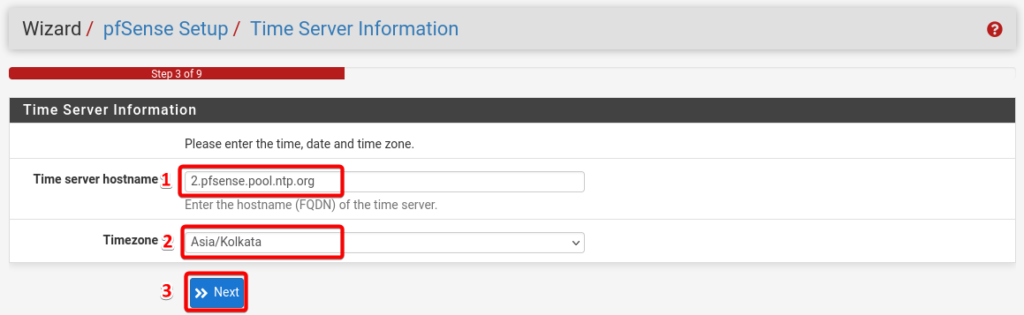
Select the timezone and click next.
Once the setup reached step 4 – Configure WAN Interfaces, leave all the configuration unchanged and scroll all the way down, till you find the section named RFC 1918 Networks.
Uncheck the box named block private networks from entering the WAN and select next.

No configuration needed for the step 5- Configure LAN Interfaces.

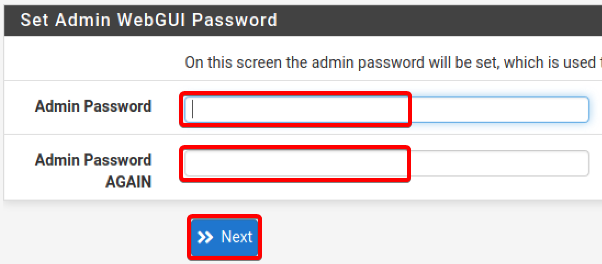
Please change the Admin password in the set admin WebGUI Password page.
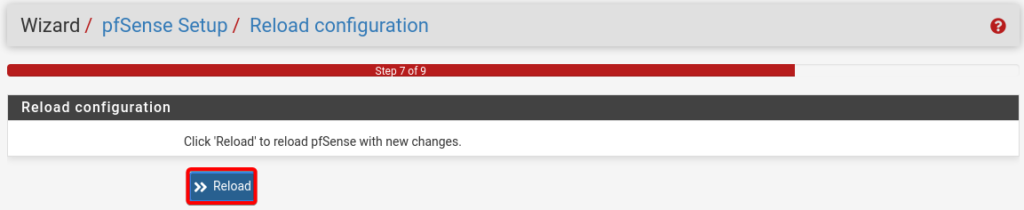
Press Reload to apply the configuration changes.
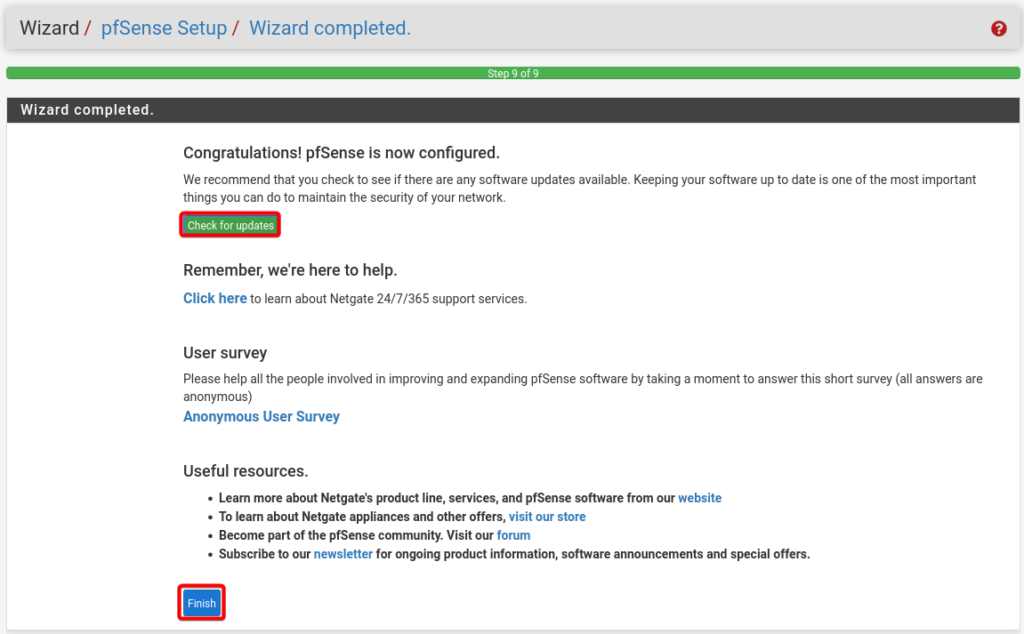
Click Finish to close setup, you can also click on Check for Updates.
Configuring Interfaces.
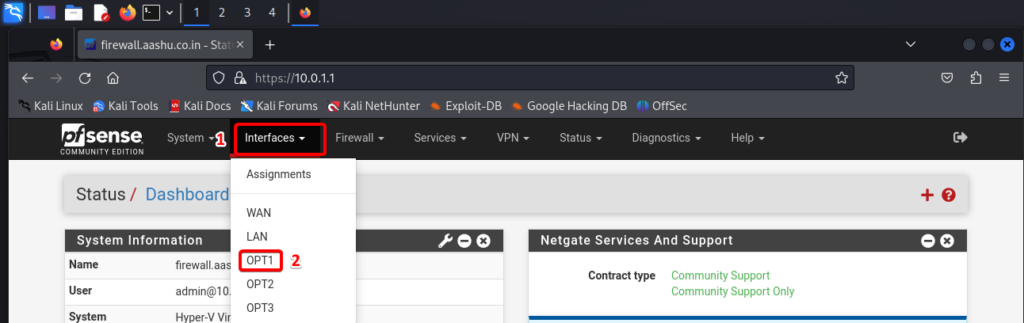
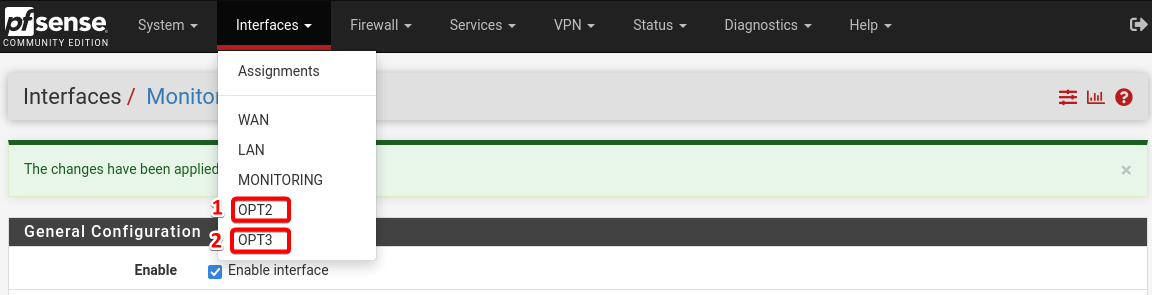
Once you are on the pfSense dashboard, click on Interfaces option and select the interface named OPT1
Change the description of the Interface to Monitoring.

Press Save and press Apply Changes

Once the changes are applied, select OPT2 and change the description to AD Lab and change the description of OPT3 to Vulnerable Machines
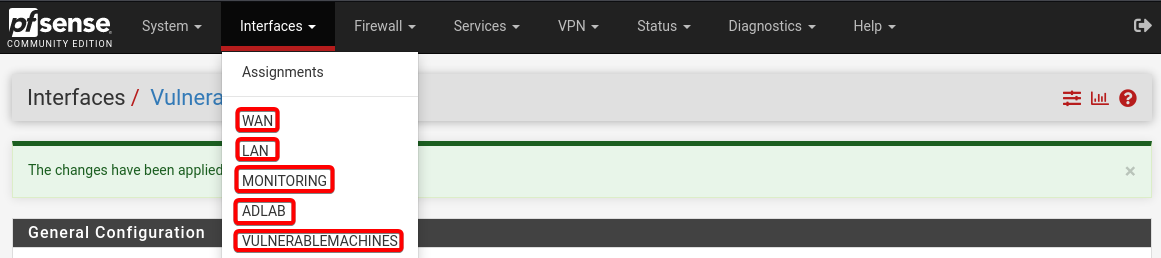
The changes description of the interfaces should look like the below.
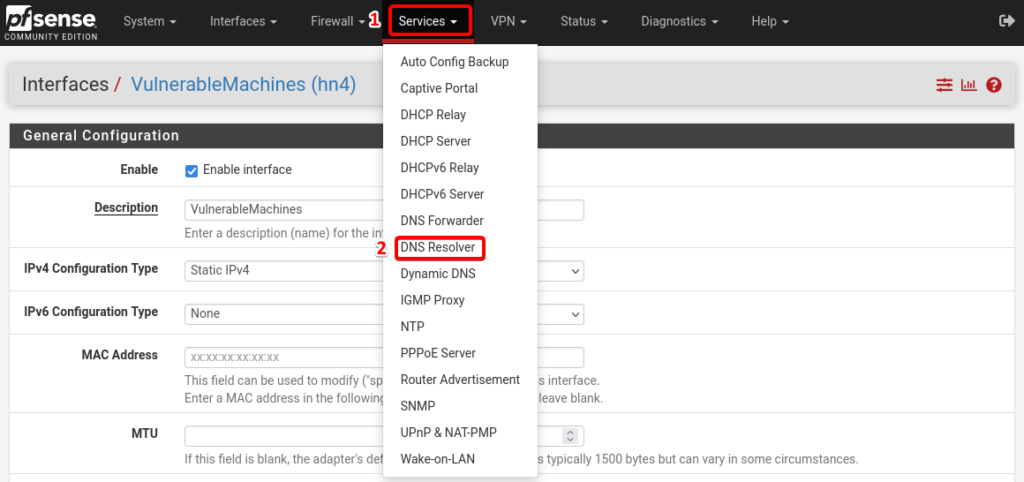
Configure DNS Resolver Service.
In the Services column, select DNS Resolver and then General Settings.
Scroll down and make sure the settings under DHCP Registration and Static DHCP is enabled (Check Marked).

In the DNS Resolver page, select Advanced Settings and make sure the options under Prefetch Support and Prefetch DNS Key Support is enabled (Check Marked).
Scroll down, select Save and Apply Changes.
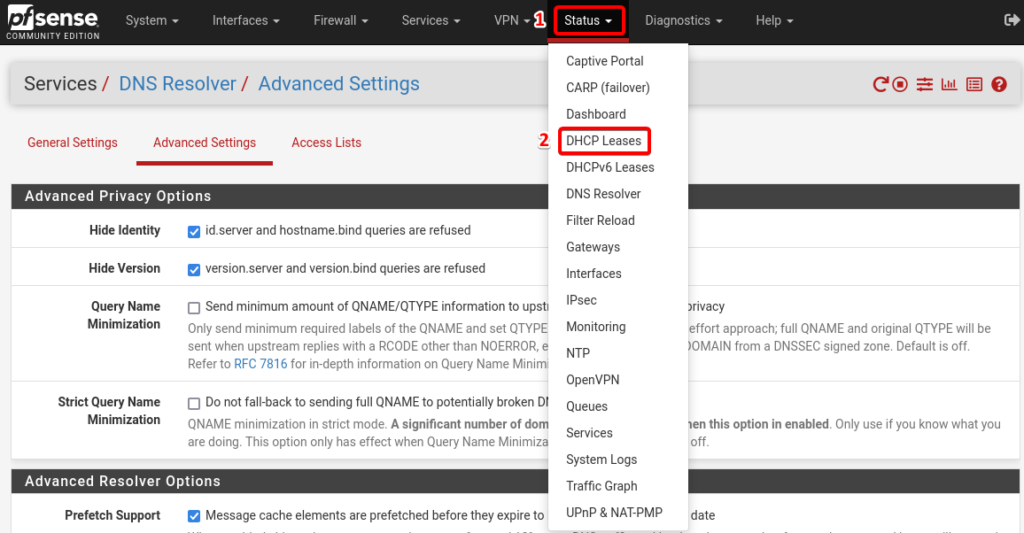
Assign Static IP address for Kali Linux VM.
Navigate to Status and then select DHCP Leases.
Select the plus icon to add static mapping for the kali Linux machine.
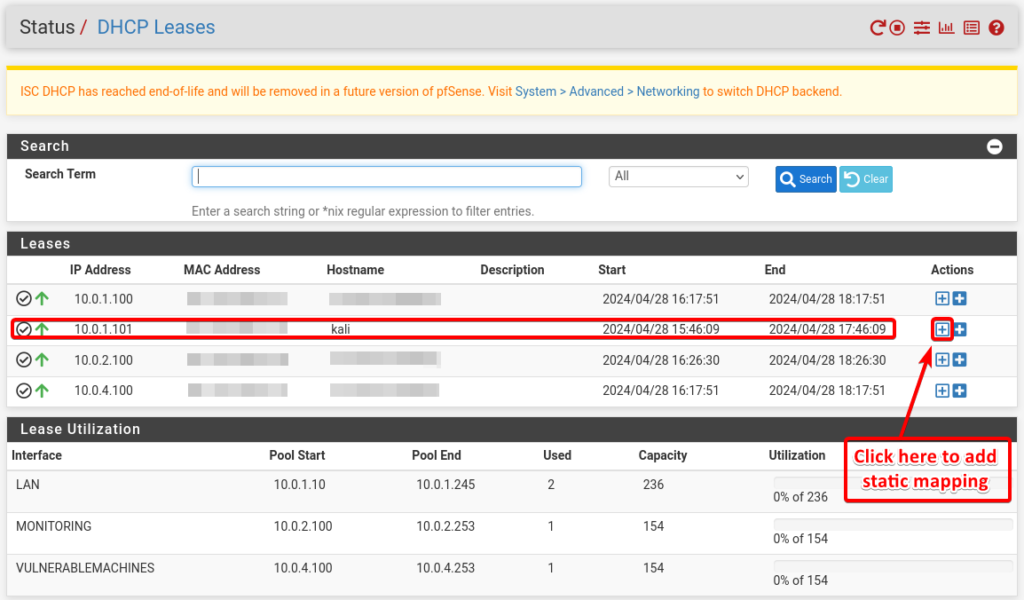
Add the IP Address 10.0.1.2 in the IP address section.
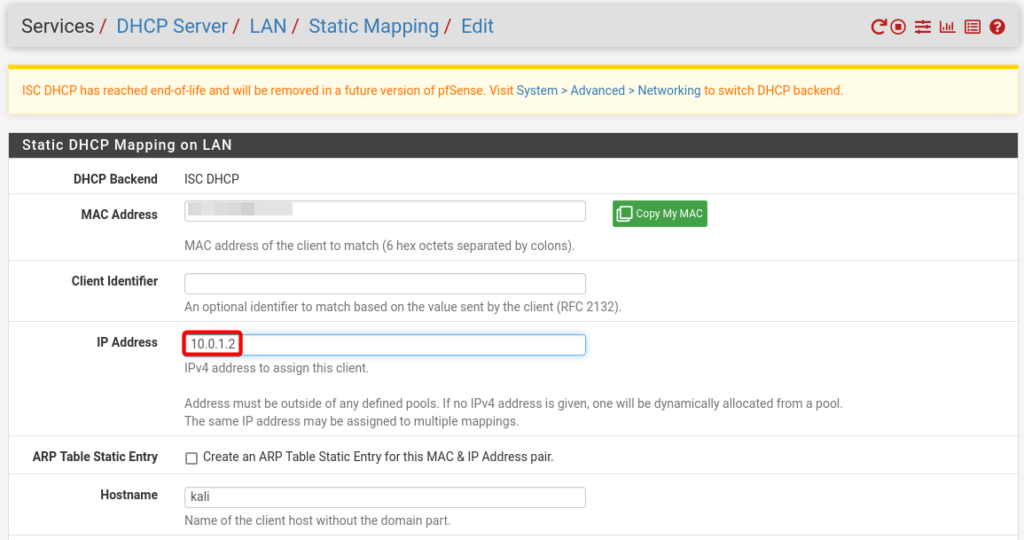
Scroll down and select Save and Apply Changes.

Reboot the Kali Linux VM using the command sudo reboot and use the command ip address to confirm the static IP address is assigned to the machine.
Configure Firewall Rules.
Firewall rules are processed from top to bottom, add all the allow rule at the top and all the block rules at the bottom.
Create Aliases for IP addresses.
Navigate to Firewall section and select Alias and click on IP and select ![]()
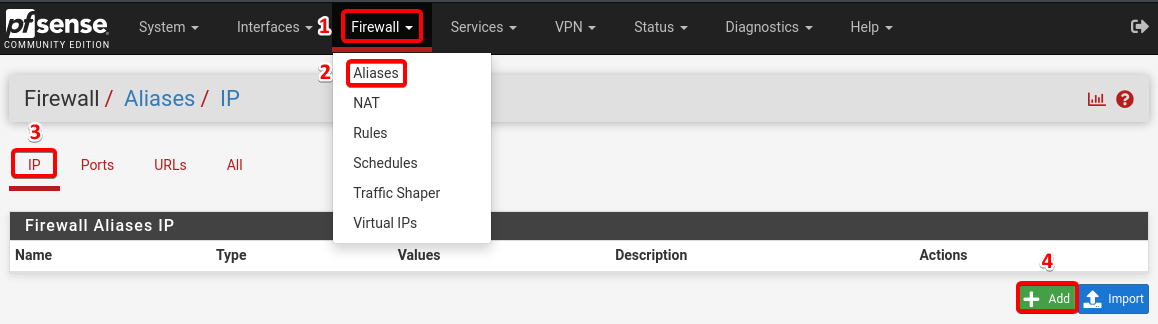
Add the below details in the IP alias section.
- Name: Private_IP_Address_List
- Description: Private IP Address List
- Type: Network(s)
- Network 1: 10.0.0.0/8
- Network 2: 172.16.0.0/12
- Network 3: 192.168.0.0/16
- Network 4: 169.254.0.0/16 (Automatic Private IP Addressing (APIPA) OR link-local address)
- Network 5: 127.0.0.0/8 (Loopback Address of machine)
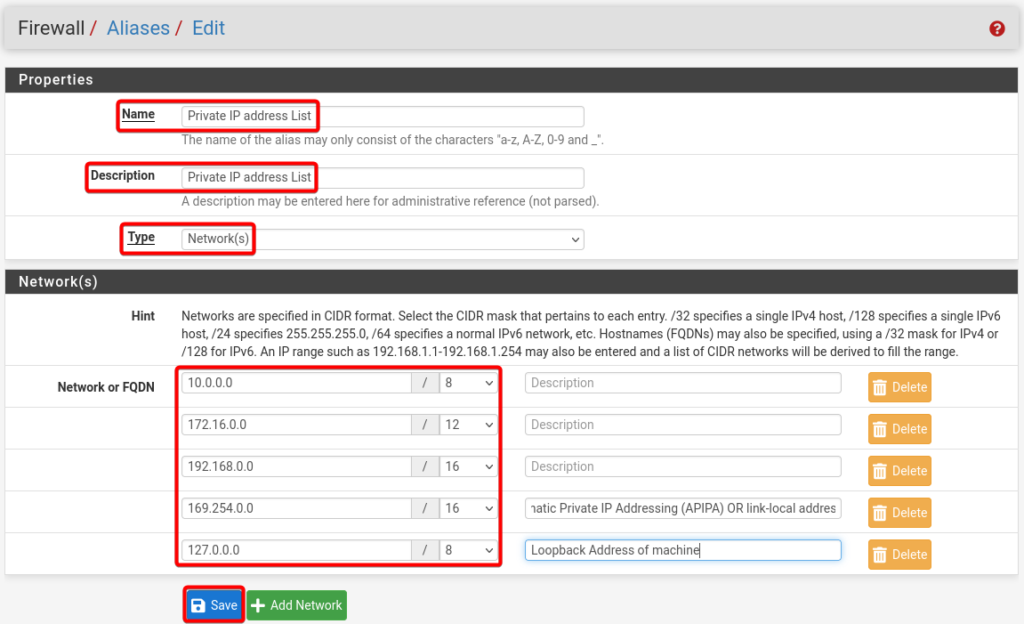
Select Save and Apply Changes
LAN Rule.
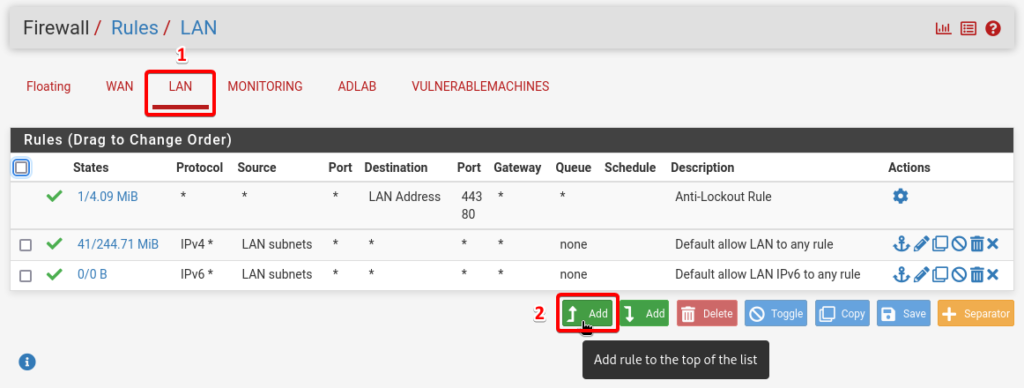
Navigate to Firewall section and then select Rules.
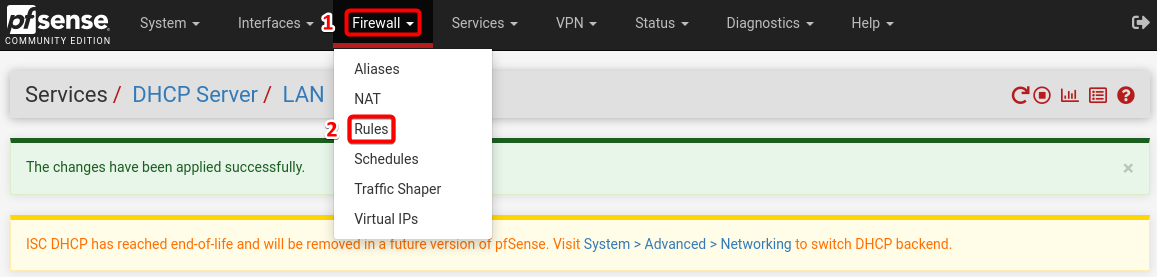
Select the option LAN and select the add rule to the top of the list button shown as ![]()
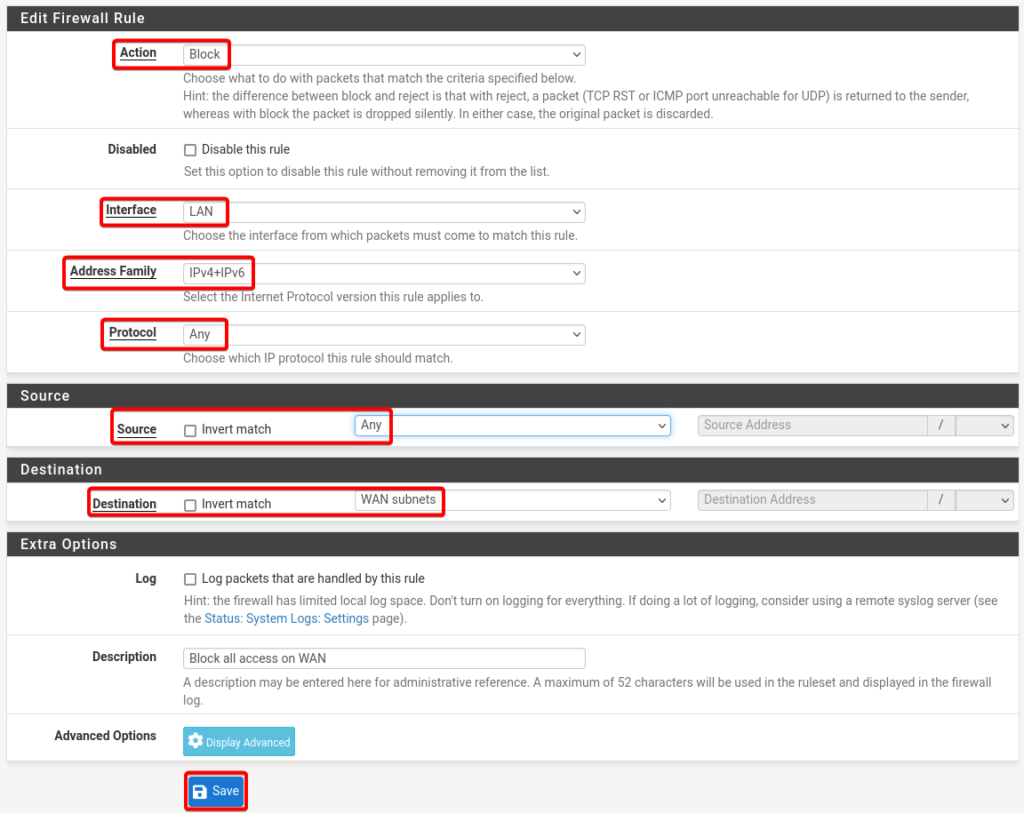
Details of LAN rule.
- Action: Block
- Interface: LAN
- Address Family: IPv4 + IPv6
- Protocol: Any
- Source: Any
- Destination: WAN subnets
- Description: Block all access on WAN
- Select Save and click Apply Changes
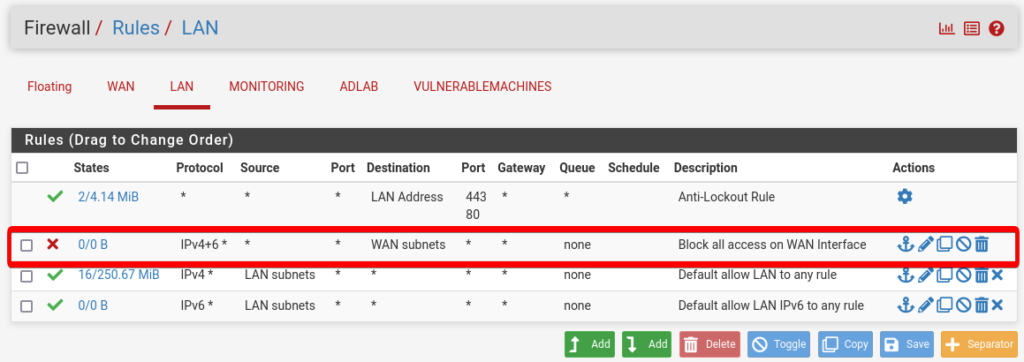
Below should be the LAN rule look like.
Monitoring Rule.
Navigate to Firewall section and then select Rules.
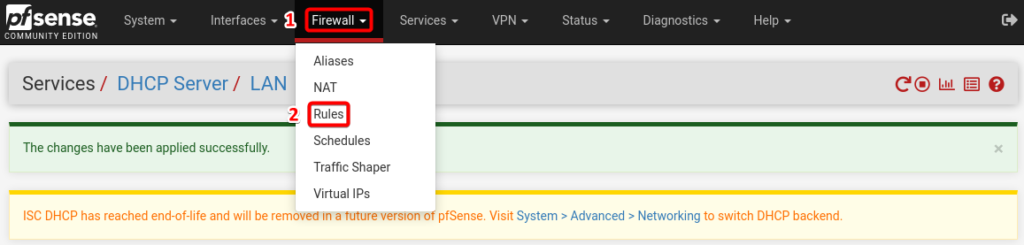
Select the tab Monitoring and select the add rule to the top of the list button shown as ![]()
Details of Monitoring Rule.
- Action: Pass
- Interface: Monitoring
- Address Family: IPv4 + IPv6
- Protocol: Any
- Source: Any
- Destination: Any
- Description: Allow Connection to all
- Select Save and click Apply Changes
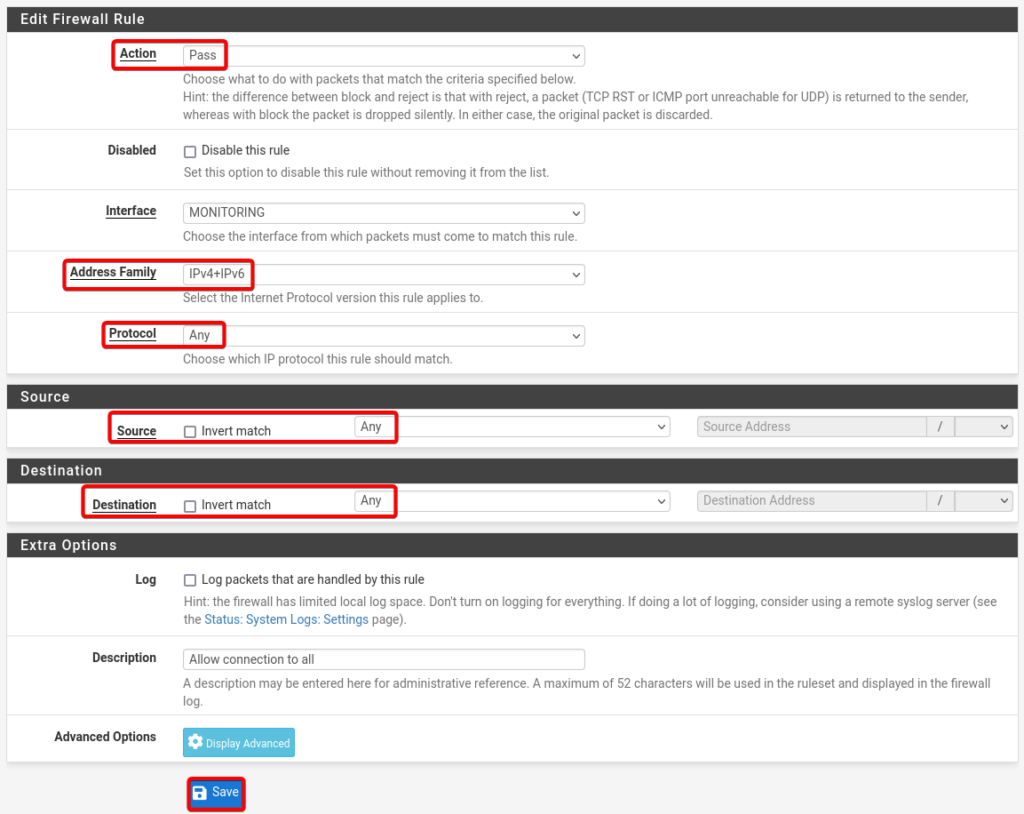
AD Lab Rule no 1.
Navigate to Firewall section and then select Rules.

Select the option ADLAB and select the add rule to the top of the list button shown as ![]()
Details of AD Rule no 1.
- Action: Pass
- Interface: ADLAB
- Address Family: IPv4
- Protocol: Any
- Source: ADLAB Subnets
- Destination: Invert Match Addresses or Alias = Private_IP_address_List
- Description: Allow connection to non private IP address
- Select Save and click Apply Changes
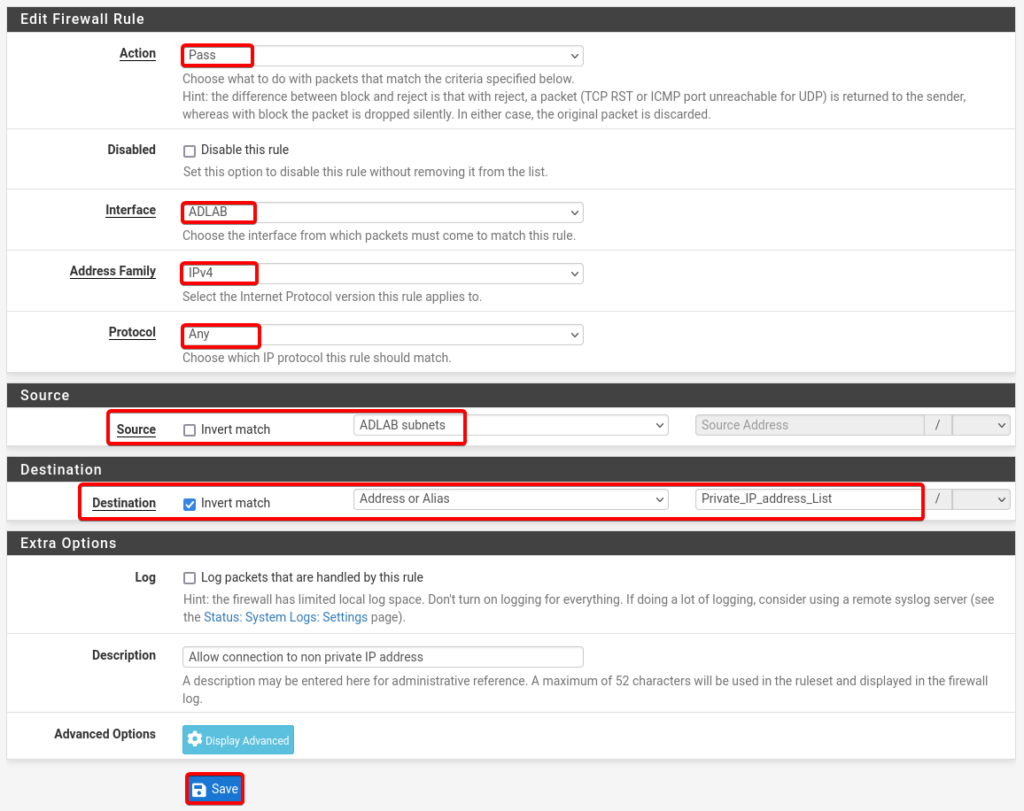
AD Lab Rule no 2.
In the ADLAB firewall section, select the add rule to the top of the list button shown as ![]()
Details of AD Rule no 2.
- Action: Pass
- Interface: ADLAB
- Address Family: IPv4
- Protocol: Any
- Source: ADLAB Subnets
- Destination: Addresses or Alias = 10.0.1.2
- Description: Allow connection to Kali Linux Machine
- Select Save and click Apply Changes
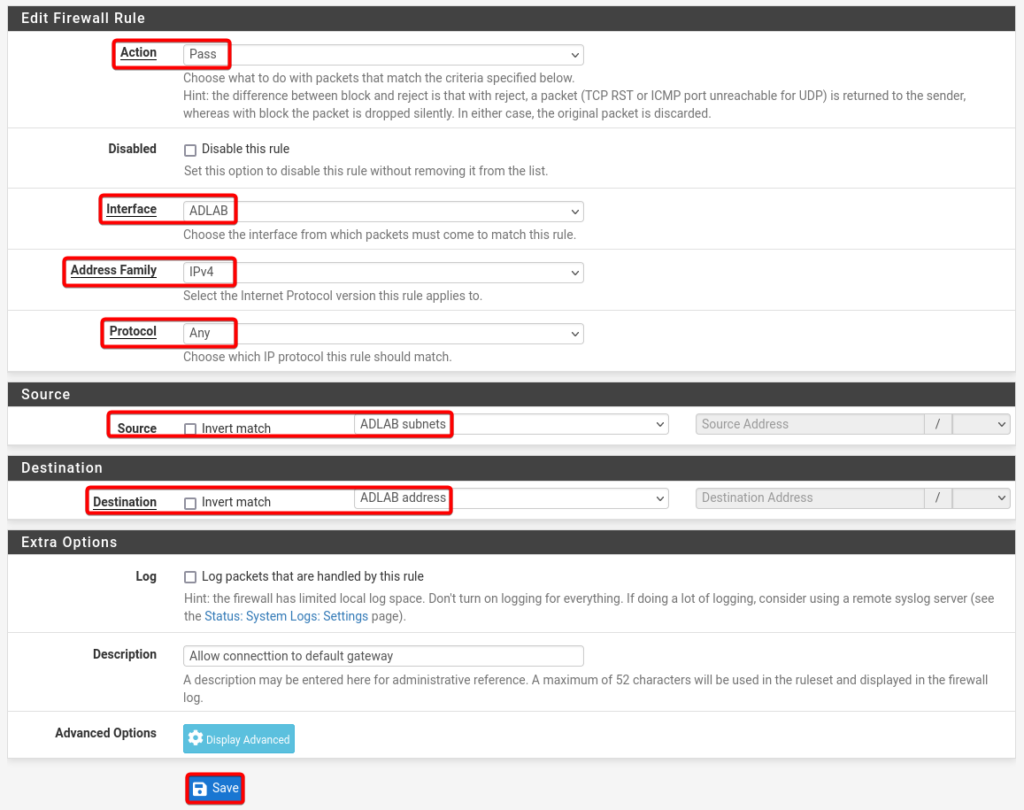
AD Lab Rule no 3.
In the ADLAB firewall section, again select the add rule to the top of the list button shown as ![]()
Details of AD Rule no 3.
- Action: Pass
- Interface: ADLAB
- Address Family: IPv4
- Protocol: Any
- Source: ADLAB Subnets
- Destination: ADLAB address
- Description: allow connection to default gateway
- Select Save and click Apply Changes
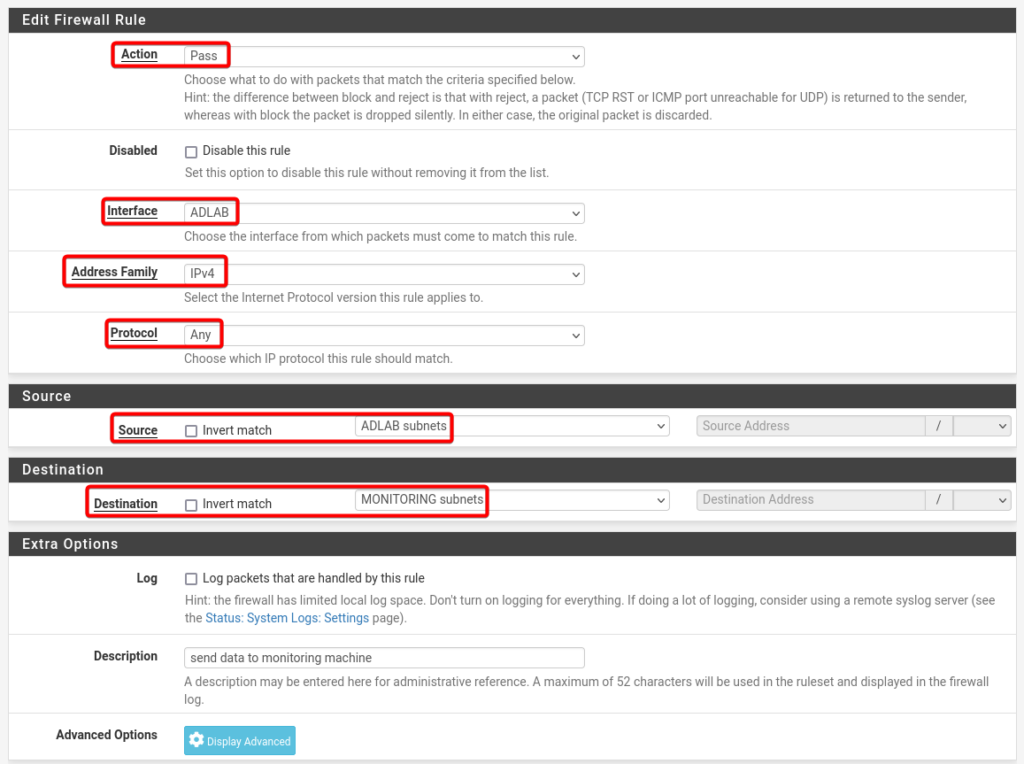
AD Lab Rule no 4.
In the ADLAB firewall section, again select the add rule to the top of the list button shown as ![]()
Details of AD Rule no 4.
- Action: Pass
- Interface: ADLAB
- Address Family: IPv4
- Protocol: Any
- Source: ADLAB Subnets
- Destination: MONITORING Subnets
- Description: Send data to Monitoring machine
- Select Save and click Apply Changes
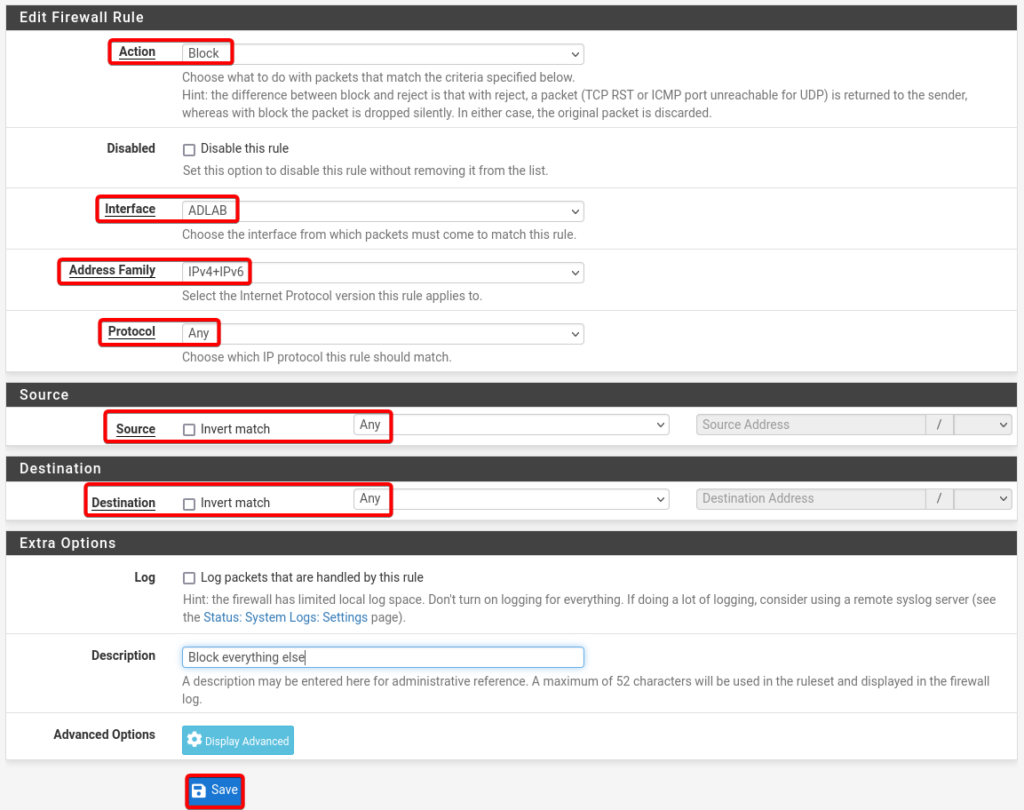
Final AD Lab Rule.
In the ADLAB firewall section, select the add rule to the end of the list button shown as ![]()
Details of Final AD Rule.
- Action: Block
- Interface: ADLAB
- Address Family: IPv4 + IPv6
- Protocol: Any
- Source: Any
- Destination: Any
- Description: Block everything else
- Select Save and click Apply Changes
Below should be all the ADLAB RULES should look like.

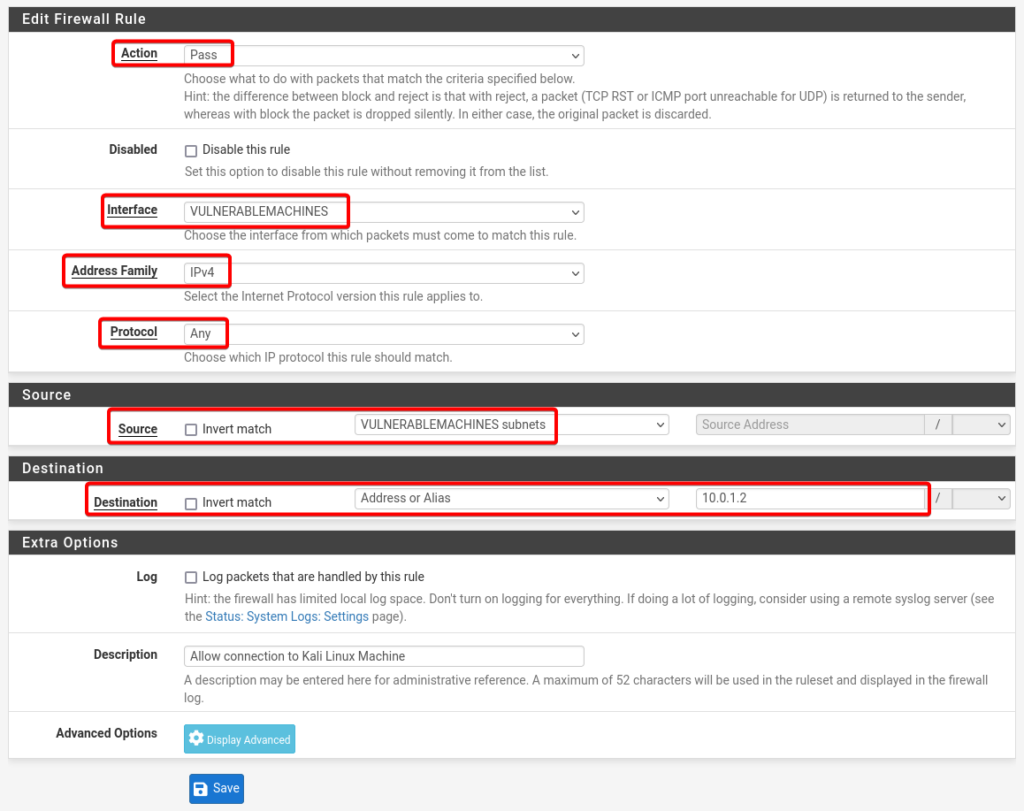
Vulnerable Machines Rule no 1.
In the VULNERABLEMACHINES firewall section, select the add rule to the top of the list button shown as ![]()
Details of Vulnerable Machines Rule
- Action: Pass
- Interface: VULNERABLEMACHINES
- Address Family: IPv4
- Protocol: Any
- Source: VULNERABLEMACHINES subnets
- Destination: Address or alias = 10.0.1.2
- Description: Allow connection to Kali Linux Machine
- Click Save and Apply Changes
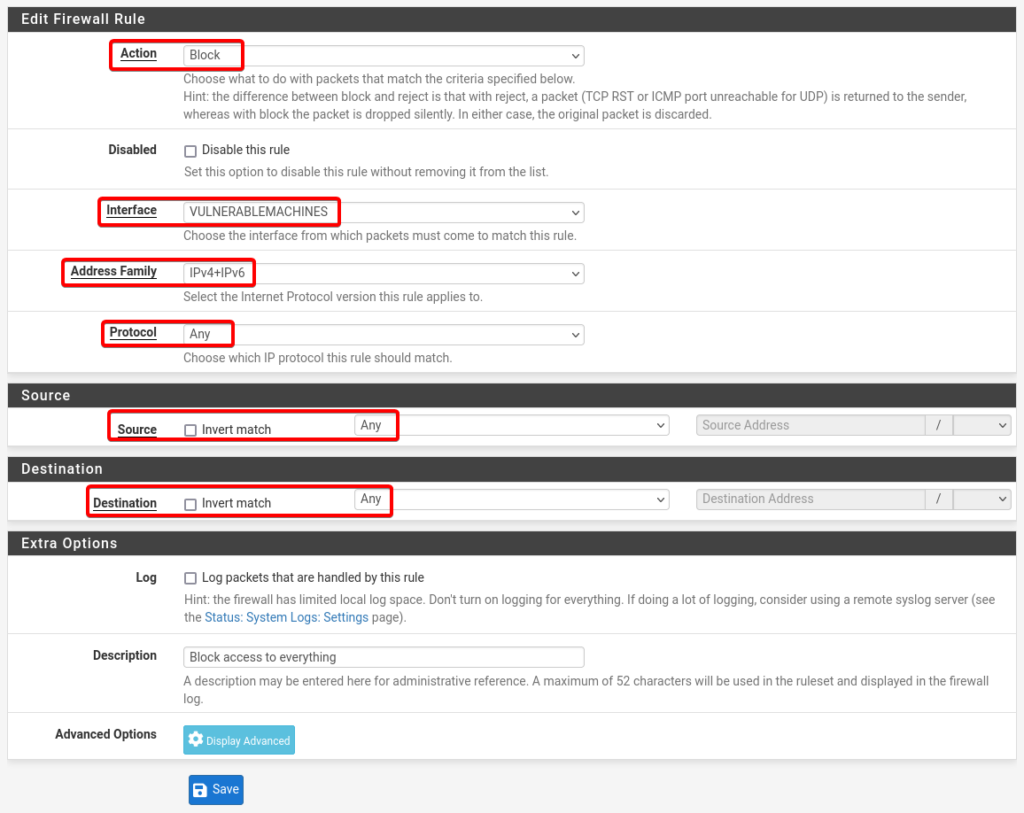
Vulnerable Machines Rule no 2.
In the VULNERABLEMACHINES firewall section, select the add rule to the end of the list button shown as ![]()
Details of Vulnerable Machines Rule 2.
- Action: Block
- Interface: VULNERABLEMACHINES
- Address Family: IPv4 + IPv6
- Protocol: Any
- Source: Any
- Destination: Any
- Description: Block access to everything
- Click Save and Apply Changes
In this article we have configured the services and rules to block and allow connections in pfSense firewall.