In order to create Vulnerable Machines, we will use Metasploitable 2. Metasploitable 2 is an intentionally vulnerable virtual machine that security professionals and enthusiasts can use for testing common vulnerabilities. It allows them to practice penetration testing techniques, test security tools, and explore common security flaws.
The Metasploitable 2 will have the disk in .vmdk but the disk format used by Hyper-V is .vhdx. So, once the Metasploitable 2 is downloaded, we will convert the .vmdk file to .vhdx
- Part 1 – Overview and Network Configuration.
- Part 2 – Installing pfSense Firewall on Virtual Machine.
- Part 3 – Setup Kali Linux on Virtual Machine.
- Part 4 – Configuring the pfSense Firewall.
- Part 5 – Active Directory Forest Setup.
- Part 6 – Setting up Windows 10 Machine.
- Part 7 – Setup Monitoring Tool on VM.
Table of contents
Downloading Metasploitable 2 VM.
You can download the VM from https://vulnhub.com/entry/metasploitable-2,29/ or from https://information.rapid7.com/download-metasploitable-2017.html
Once downloaded, extract the files into a folder.
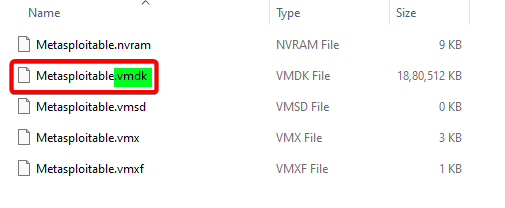
Notice the file format is .vmdk now in the next step, we will convert the file to .vhdx
You can choose from many Vulnerable Machines as a target by downloading it from https://vulnhub.com/
Convert the Virtual Disk format.
In order to convert the virtual disk format to .vhdx, we can use various file convertor tools. I am using Microsoft Virtual Machine Converter. Reference Microsoft Virtual Machine Converter 3.0 is now available for download
Please use the URL to download Microsoft Virtual Machine Converter. If the url does not work, then we can use any convertor like Starwind V2V Converter or WinImage
Install the Microsoft Virtual Machine Converter tool and follow the below steps to convert the virtual disk format.
- Open PowerShell window with elevated permissions (as an administrator).
- Use the below command to import the MVMC module:
PS C:\Users\ashut> Import-Module "C:\Program Files\Microsoft Virtual Machine Converter\MvmcCmdlet.psd1"- Use the below command to convert the virtual disk in .vmdk to .vhdx
PS C:\Users\ashut> ConvertTo-MvmcVirtualHardDisk -SourceLiteralPath "C:\NEW DRIVE\OS\Metasploitable2-Linux\Metasploitable.vmdk" -DestinationLiteralPath "C:\NEW DRIVE\OS\Metasploitable2-Linux\" -VhdType DynamicHardDisk -VhdFormat Vhdx- -SourceLiteralPath: Location of the .vmdk file.
- -DestinationLiteralPath: Location where you want to save the new Vhdx file.
- -VhdType: Specifies the type for a VHD. Valid values are: FixedHardDisk and DynamicHardDisk.
- -VhdFormat: Specifies the file format for a VHD. Valid values are: Vhd and Vhdx.
Once the command is executed successfully, the .vhdx file will be created in the destination folder.
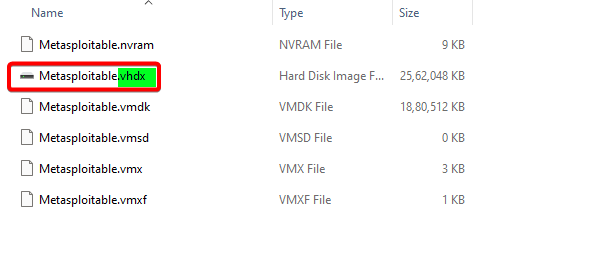
Create Metasploitable 2 VM.
Open the Hyper-V Manager and Click New > Virtual Machine from the Actions list.

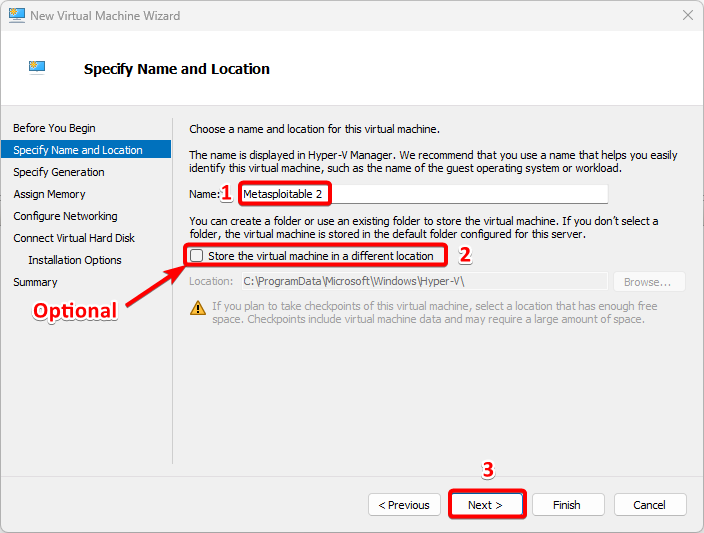
In Specify Name and Location step, Enter a Name for the virtual machine as Metasploitable 2.
Select another location on disk to store the VM data (Optional).
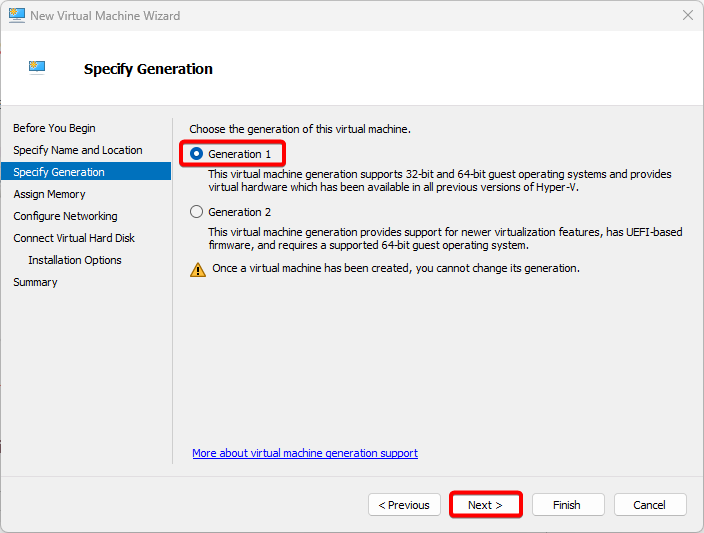
In the Specify Generation step, Select the appropriate virtual machine generation: Generation 1.
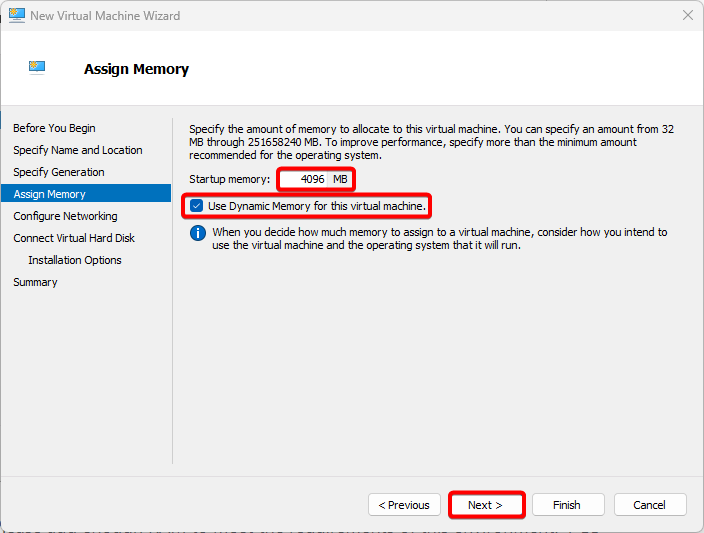
In the Assign Memory step, Please add enough RAM to meet the requirements of this environment. 4 GB RAM or more is better. Make sure you select “use dynamic memory for this virtual machine“.
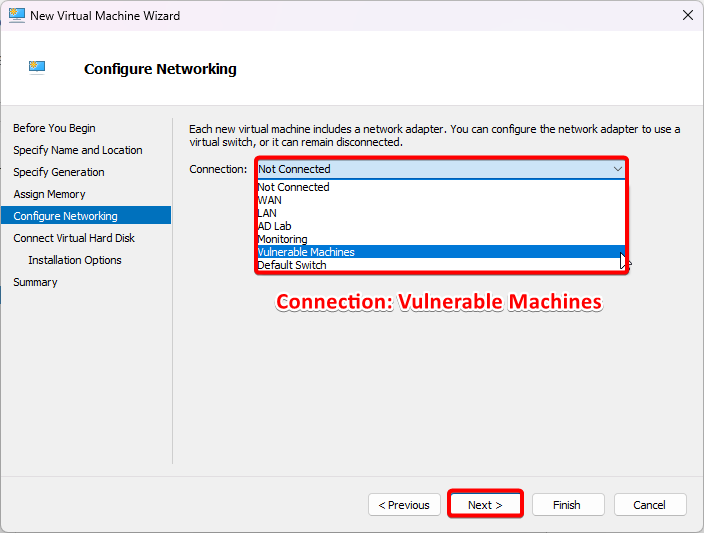
In the Configure Networking step, Select Vulnerable Machines from Connection drop-down menu.
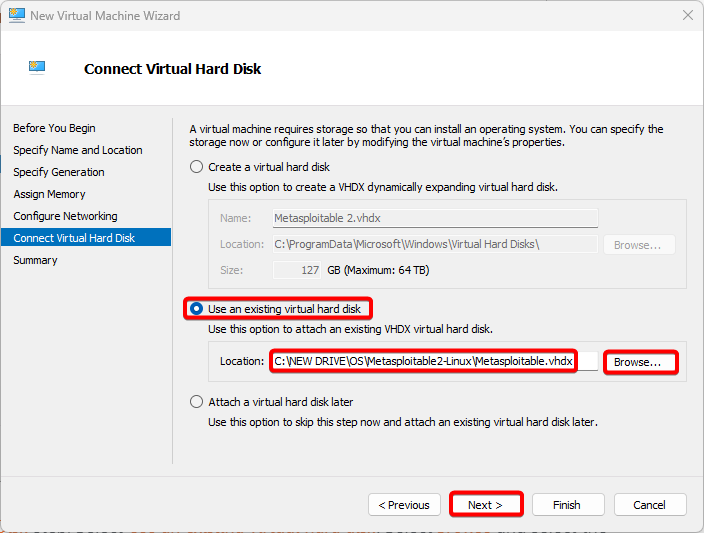
In the Connect Virtual Hard Disk step, Select Use an existing virtual hard disk. Select browse and select the disk which is converted to .vhdx file.
Click Finish if all of the information is correct.
Change VM Settings.
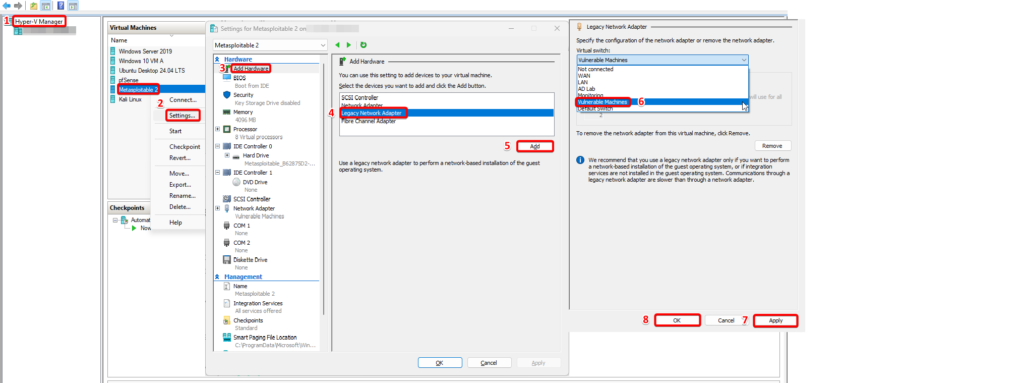
- Open Hyper-V Manager
- Right click on Metasploitable 2 VM and select settings.
- Click on Add Hardware
- Select Legacy Network Adapter
- Click Add
- Select the connection as Vulnerable Machines in the legacy network adapter.
- Apply
- Ok
Log in to Metasploitable 2 VM.
After connecting Metasploitable 2 VM, start it and login using default credentials:
- Username: msfadmin
- Password: msfadmin
Use the command ip address to confirm the ip address of the Metasploitable 2 VM. I got the ip address via pfsense dhcp.

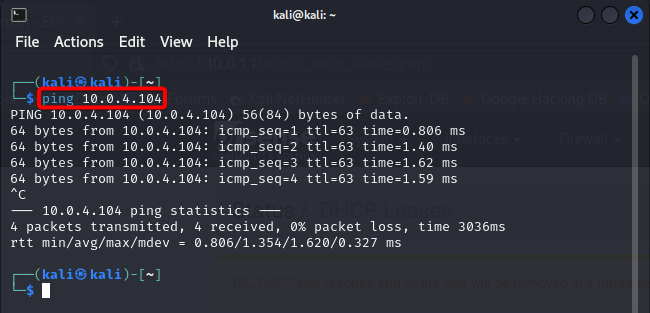
Ping Metasploitable 2 from Kali.
It should be successful.
Ping Kali from Metasploitable 2.
The ping should be successful as per the pfsense firewall rule.

Conclusion.
Now we have Setup a Cybersecurity Home Lab. It will help anyone looking to pursue a career in cybersecurity or enhance their knowledge and skills. using this we can also learn and experiment with various cybersecurity tools, techniques, methodologies and discover new methods to exploit know vulnerabilities.