The Email Communication Services (ECS) is a resource created in Azure, which lets an organization use SMTP AUTH (using Basic Authentication) and send email to internal and external recipients. Follow the link to understand the concept of Email Communication Services.
Table of contents
- Graphical representation of ECS.
- Prerequisites of using Email Communication Services.
- Creating an Azure Communication Service Instance.
- Create an Email Communication Services resource.
- Adding Custom domain to the ECS Resource.
- Connecting Azure Communication Service Instance to Email Communication Service Resource.
- Registering the Application in Microsoft Entra Enterprise Applications.
- Connect the Enterprise Application with Azure Communication Service Instance.
- Creating Username and password for Multifunction Device.
- Sending Test Email to check the configuration.
- Conclusion.
Graphical representation of ECS.
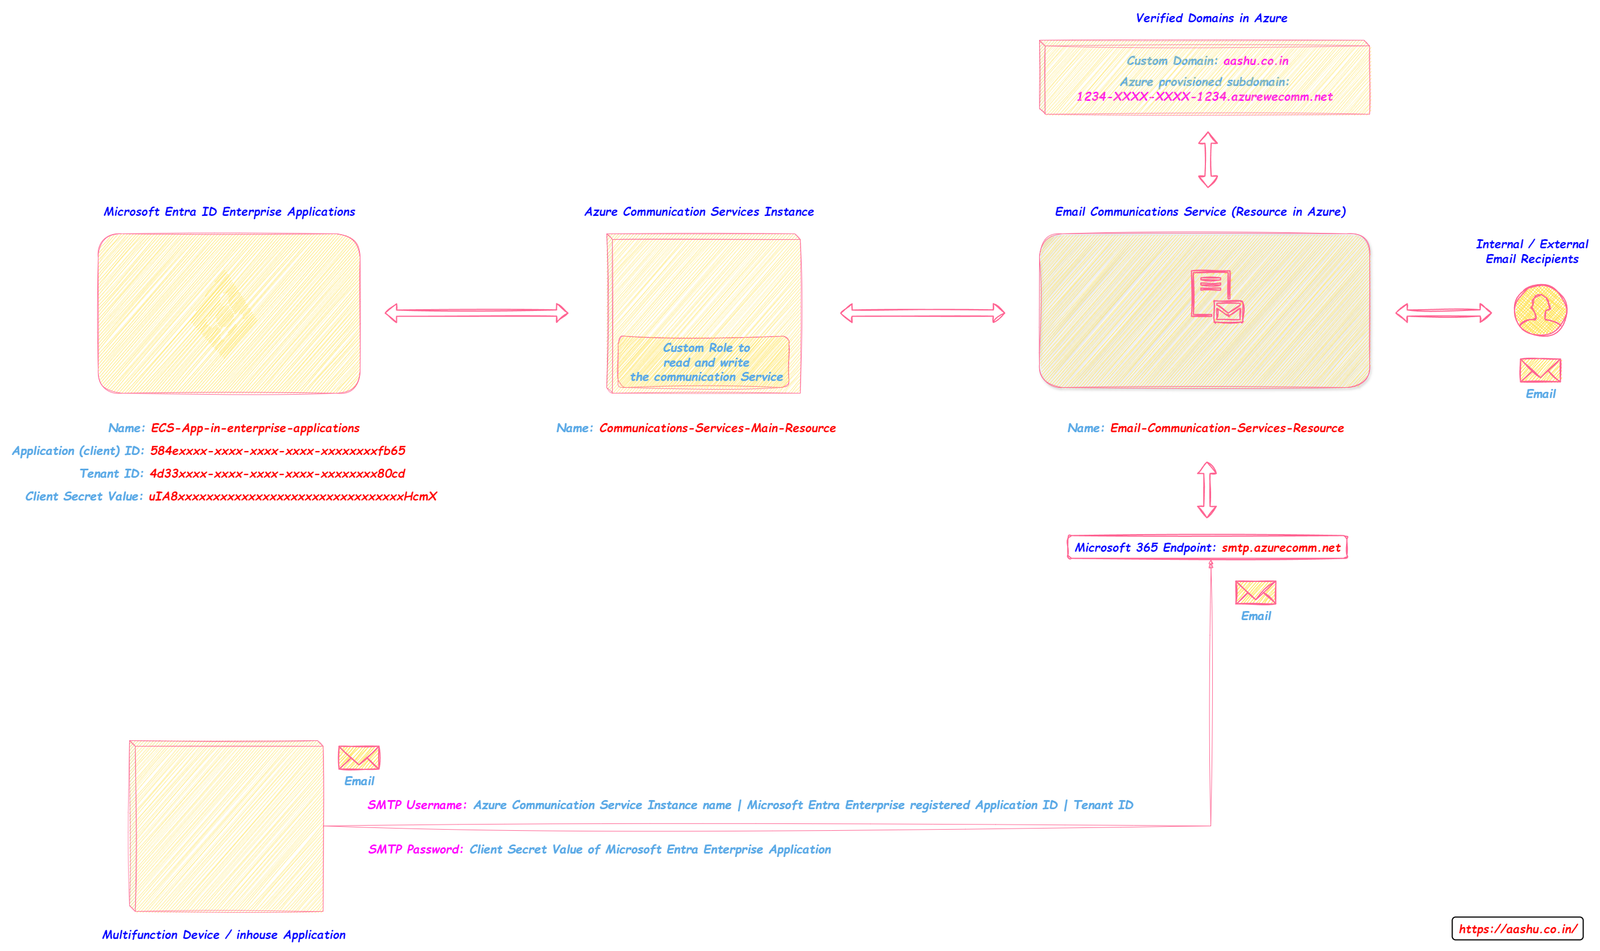
Prerequisites of using Email Communication Services.
Below are the prerequisites if the organization wants to send email using Email Communication Services.
- An active azure subscription associated with the Tenant.
- Azure Communication Services (ACS) Instance created in Azure.
- Email Communication Services (ECS) resource provisioned in Azure.
- Connection between Azure Communication Services Instance and Email Communication Services resource.
- A custom domain verified in Azure.
- Custom domain added in Email Communication Services resource.
- Microsoft Entra Enterprise Application registered and connected to Azure Communication Services Instance.
- Client Secret for Microsoft Entra Enterprise Application.
Creating an Azure Communication Service Instance.
Azure Communication Service instance is a resource in Azure, where you can integrate your custom application with communication experiences like emails, chat, voice, video calling, SMS messaging. We can say that the Azure Communication Service instance is the holding area where all the other communication features integrate with each other and this is where the organizations custom application can use those communication features.
To create a new Azure Communication Service instance, you need to.
- Navigate to https://portal.azure.com/ and select create a resource option.
- Type communication services in the search bar and select the communication services resource and press create.
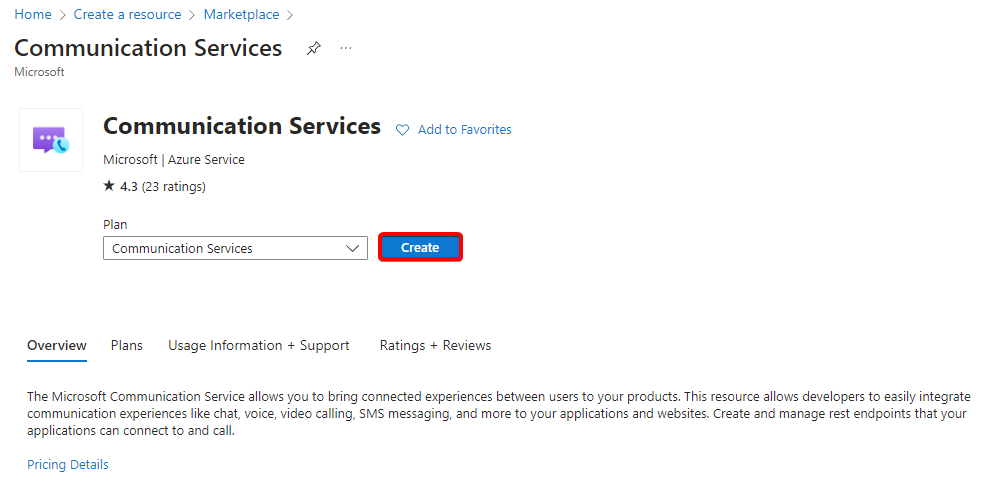
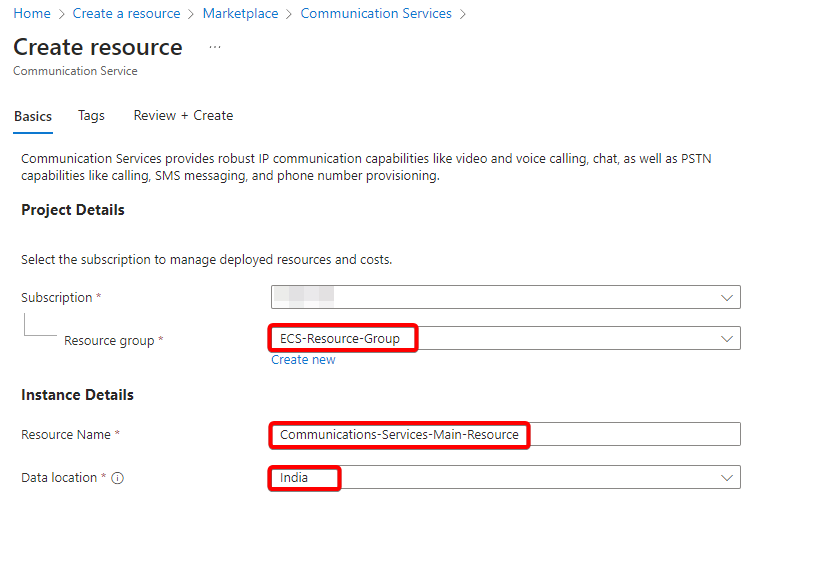
- In the Subscription section select an active azure subscription and in the Resource Group section select a previously created resource group.
- In the Data location section, select the region where the organization wants to save the data at rest.
- Add relevant Tags and then select create.
Once we navigate to https://portal.azure.com/ and then open Communication Services, we get to view the newly deployed Communication Services Instance.

Create an Email Communication Services resource.
The Email Communication Services resource will receive the emails from your organizations Multifunction Device and sends the email to internal or external users. To Provision the ECS resource we need to
- Navigate to https://portal.azure.com/
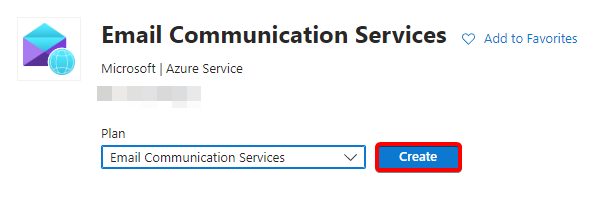
- Click on Create a resource option and select Email Communication Services.
- Select the create option to start creating Email Communication Services.
- In the Subscription section select an active azure subscription and in the Resource Group section select a previously created resource group.
- In the Data location section, select the region where the organization wants to save the data at rest.
- Add relevant Tags and then select create.
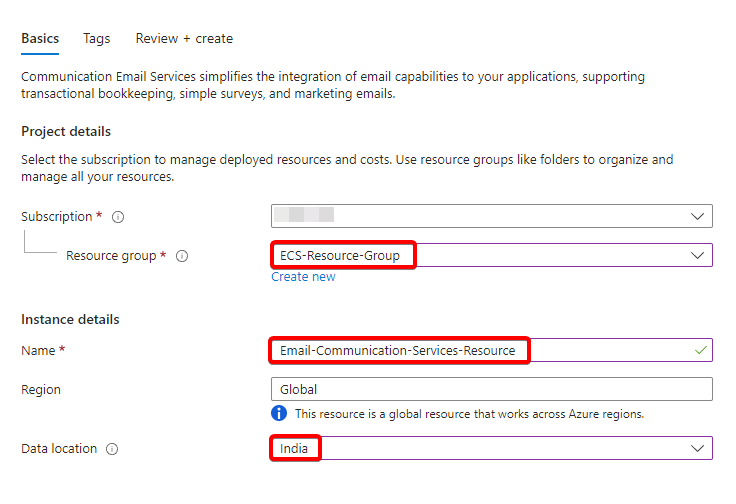
The Email Communication Resource will be deployed in the previously selected resource group.

Adding Custom domain to the ECS Resource.
After you open the ECS Resource, you will have 2 options, the first option is to use your own custom domain in ECS, and the second option is to use free Azure subdomain. Using a custom domain or a free Azure subdomain (example 1234-XXXX-XXXX-1234.azurewecomm.net) does impact the “From” address seen by the recipient.
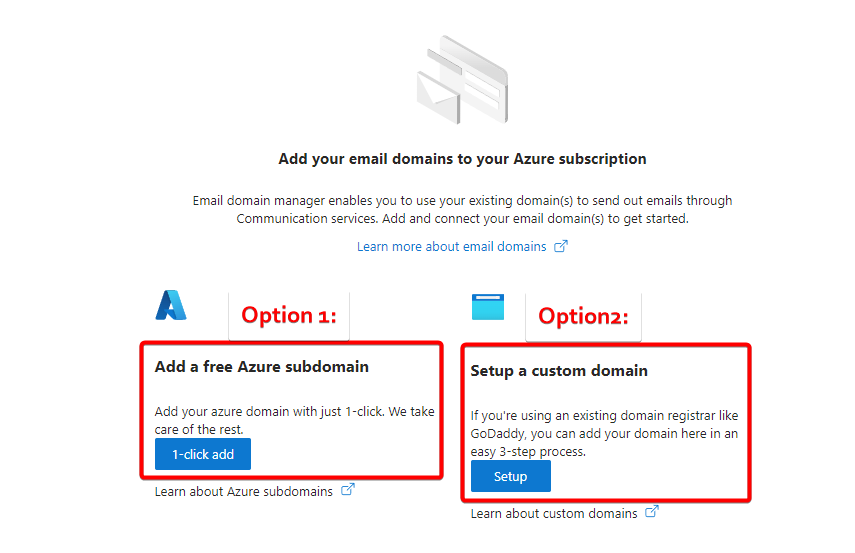
If you select the option to add free Azure subdomain, then Azure will provision sub domain for the domain azurecomm.net (example 1234-XXXX-XXXX-1234.azurewecomm.net). You can only have one Azure subdomain per Email Communication Services. The free azure subdomain will automatically verify the SPF, DKIM and DMARC.

You can also select the option to add the custom domain. After you add the custom domain, you have to verify the domain in Azure by adding the TXT record provided by Azure in the added domain’s registrar. Verify SPF, DKIM for the custom domain.

Now we have Azure provisioned sub domain (1234-XXXX-XXXX-1234.azurewecomm.net) as well as custom domain aashu.co.in verified and connected to the Email Communication Service Resource.
Connecting Azure Communication Service Instance to Email Communication Service Resource.
As the Azure Communication Service Instance and the Email Communication Service Resource, both are provisioned, now we have to connect the ACS with ECS using the below steps.
- Navigate to https://portal.azure.com/ and select the Communication Services and now open the newly deployed Communication Service Instance.
- On the left navigation pane, select Email –> Domains –> Connect domain.
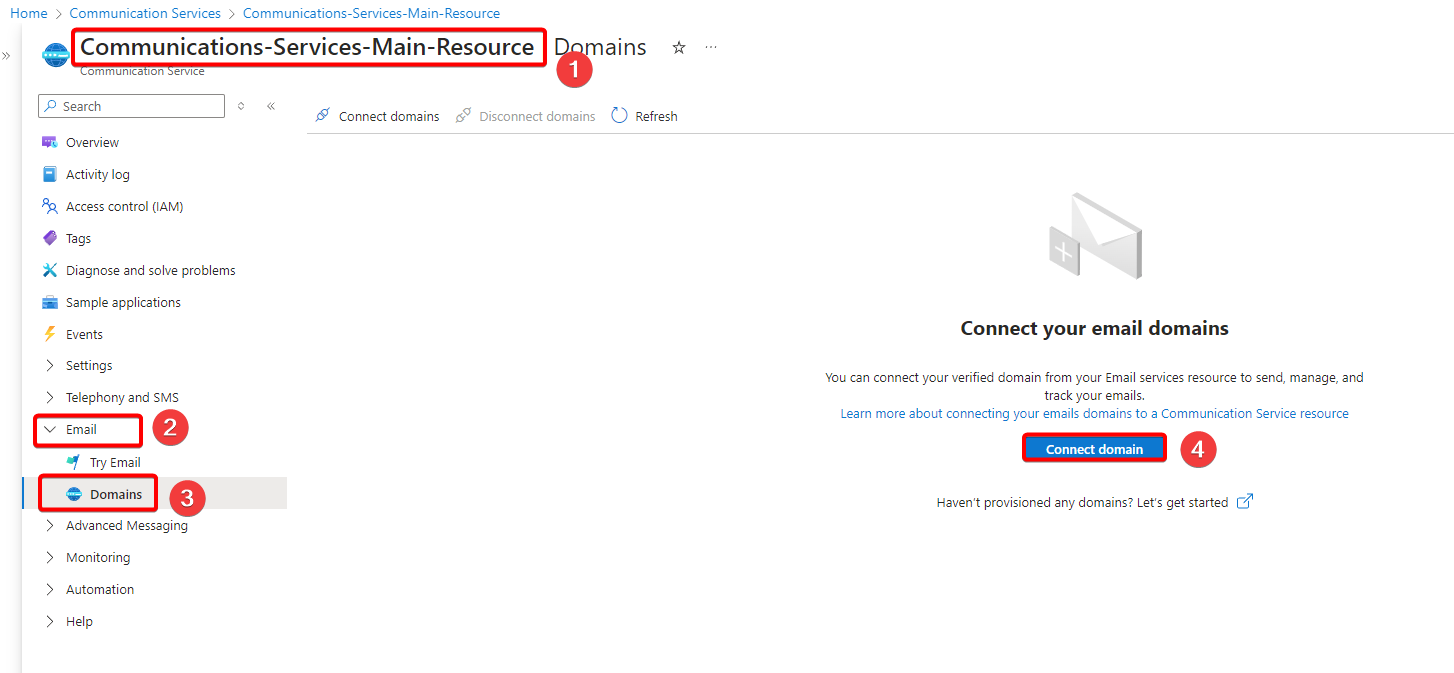
- Select the proper Azure subscription type.
- Under Resource Group select ECS-Resource-Group.
- Under Email Service select Email-Communication-Services-Resource.
- Under Verified Domain select either the custom domain or the Azure provisioned sub domain.
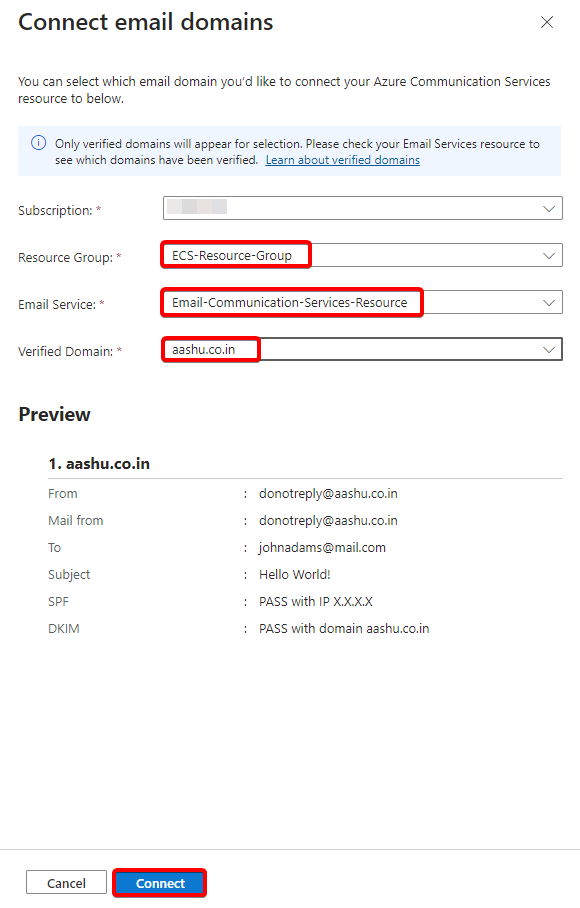
Now the Azure Communication Service Instance and the Email Communication Service Resource are connected with each other. Below is how the portal should look like after ACS is connected to ECS.

Registering the Application in Microsoft Entra Enterprise Applications.
- Login to https://entra.microsoft.com/
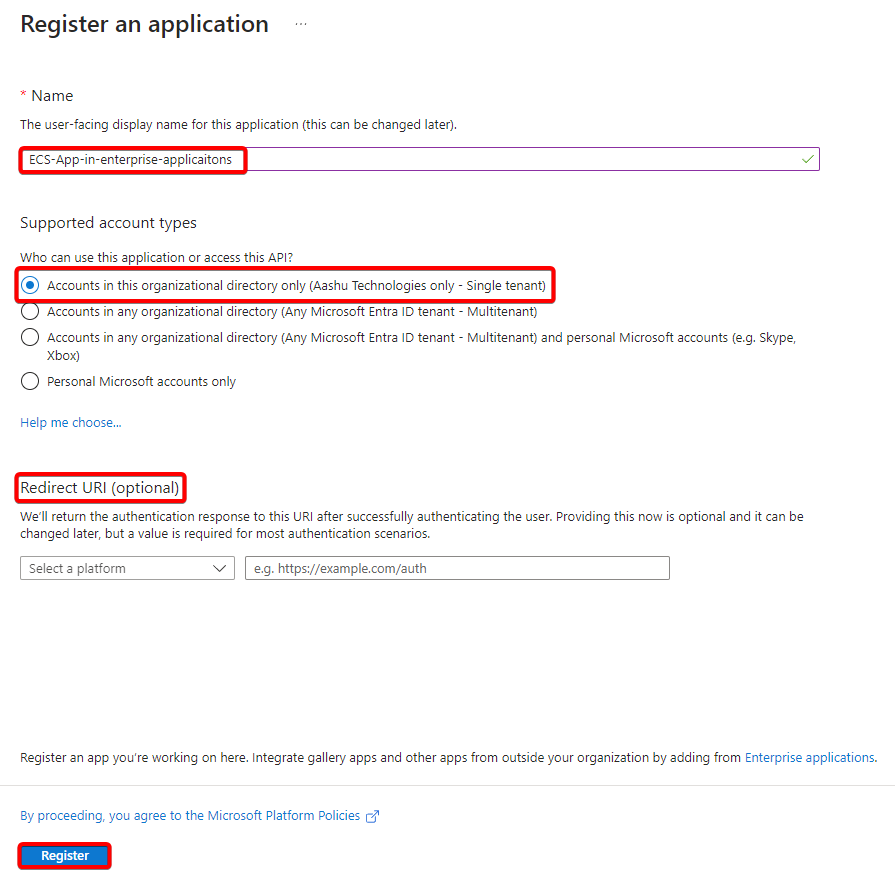
- Navigate to Identity –> Applications –> App registrations and select New registration.
- Type the name of new application (example: ECS-App-in-enterprise-applications).
- In supported account types select Accounts in this organizational directory only.
- Redirect URI is optional and it can be set later. (Redirect URI is the location where Microsoft Entra ID will send the access token to after successfully authenticating the user.)
- Select Register.
Create Client Secret for the Enterprise Application.
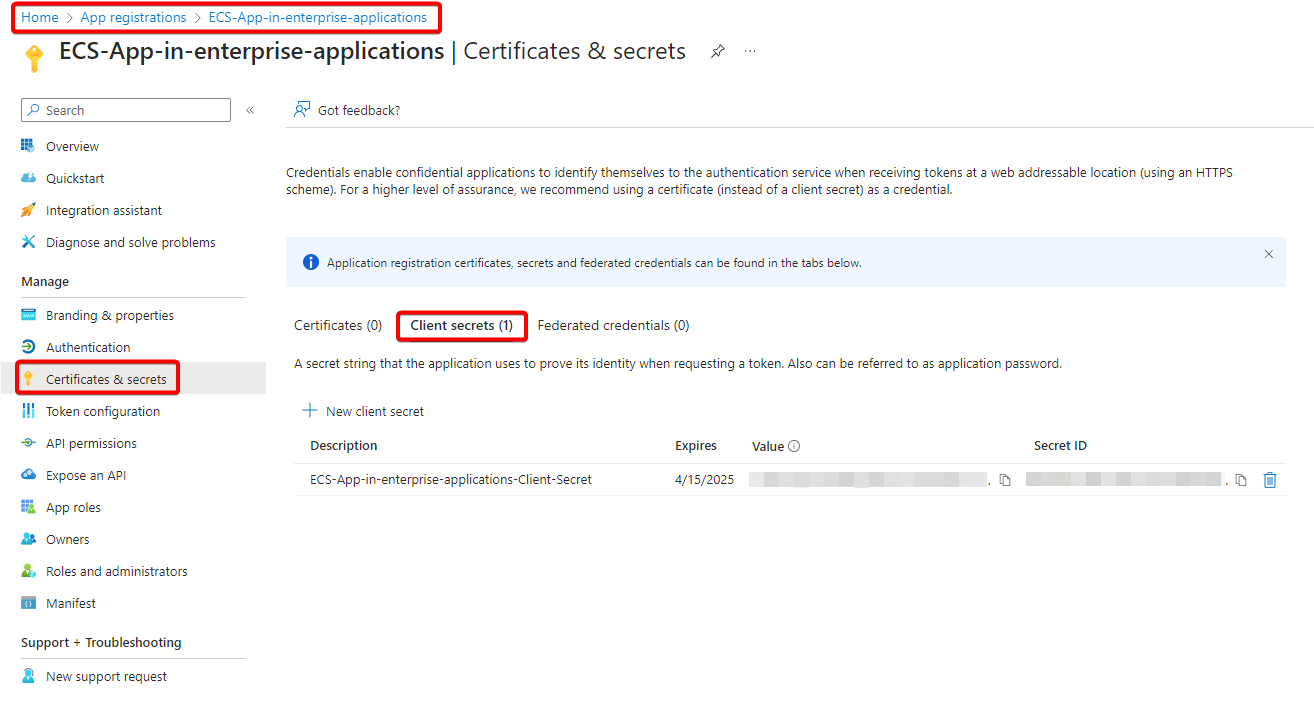
After registering the Enterprise Application, we have to create the client secret to access the enterprise application.
We have to navigate to https://entra.microsoft.com/ –> Applications –> App Registration –> All Applications –> select the application whose client secret we need to generate –> Certificates & secrets –> Client Secrets –> New Client Secret.
Connect the Enterprise Application with Azure Communication Service Instance.
As the application is registered in Microsoft Entra Enterprise Applications and the Azure Communication Service Instance is also created in Azure, we now have to connect the enterprise applications to Email Communication Service resource.
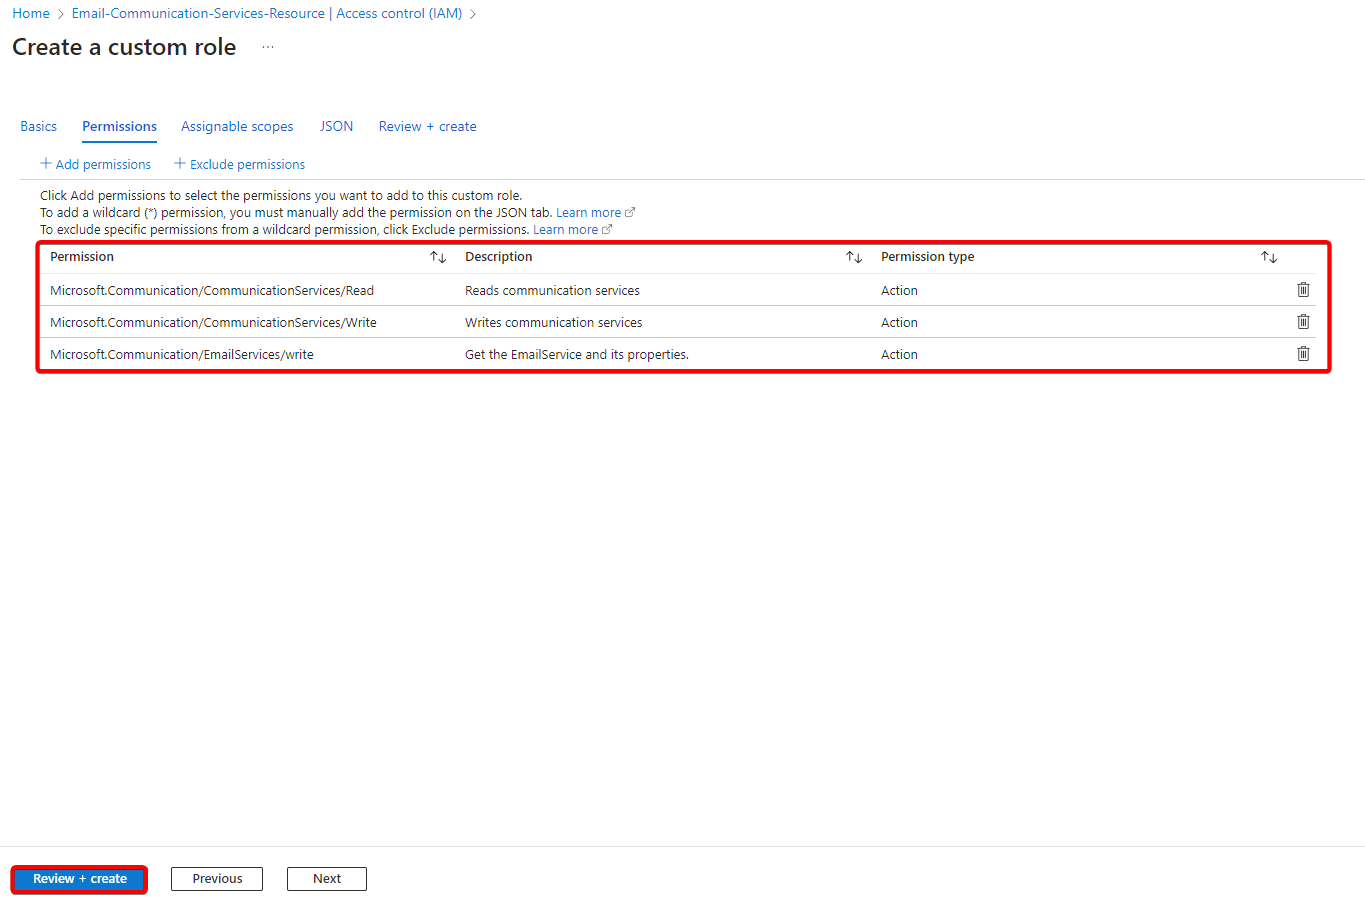
There are 3 necessary permissions to access the Email Communication Service resource, and the permissions are Microsoft.Communication/CommunicationServices/Read, Microsoft.Communication/CommunicationServices/Write and Microsoft.Communication/EmailServices/write
These permission are by default present in the contributor role, you can use contributor role or create a new custom role and assign the above permission to the new custom role.
Create a custom role in Azure Communication Service Instance.
In order to create a new custom role, please follow the below steps.
- Navigate to https://portal.azure.com/
- Open the Azure Communication Service Instance.
- Select Access control (IAM) and then select Roles.
- Select any Role and select the Clone button from the three dots.

- When the Create a custom role option page loads up select Start from scratch under Baseline permissions.
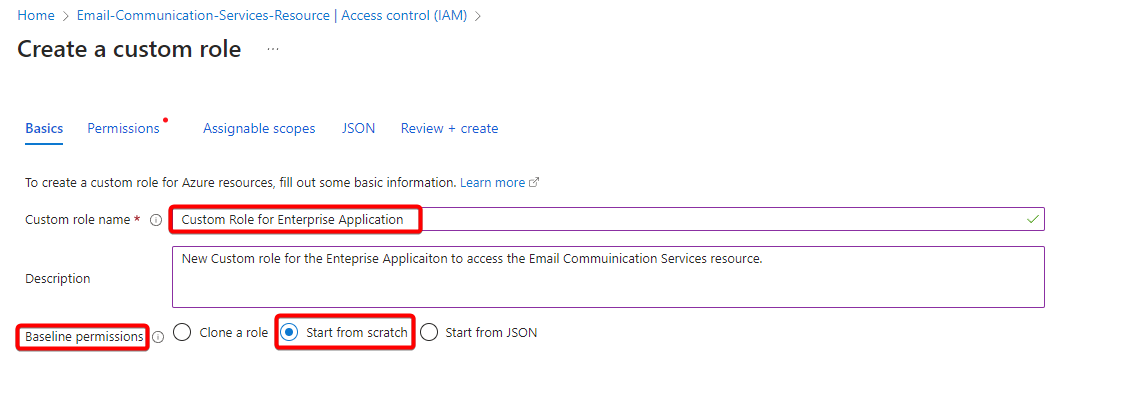
- Type the Custom role name (example: Custom Role for Enterprise Application) and select next.
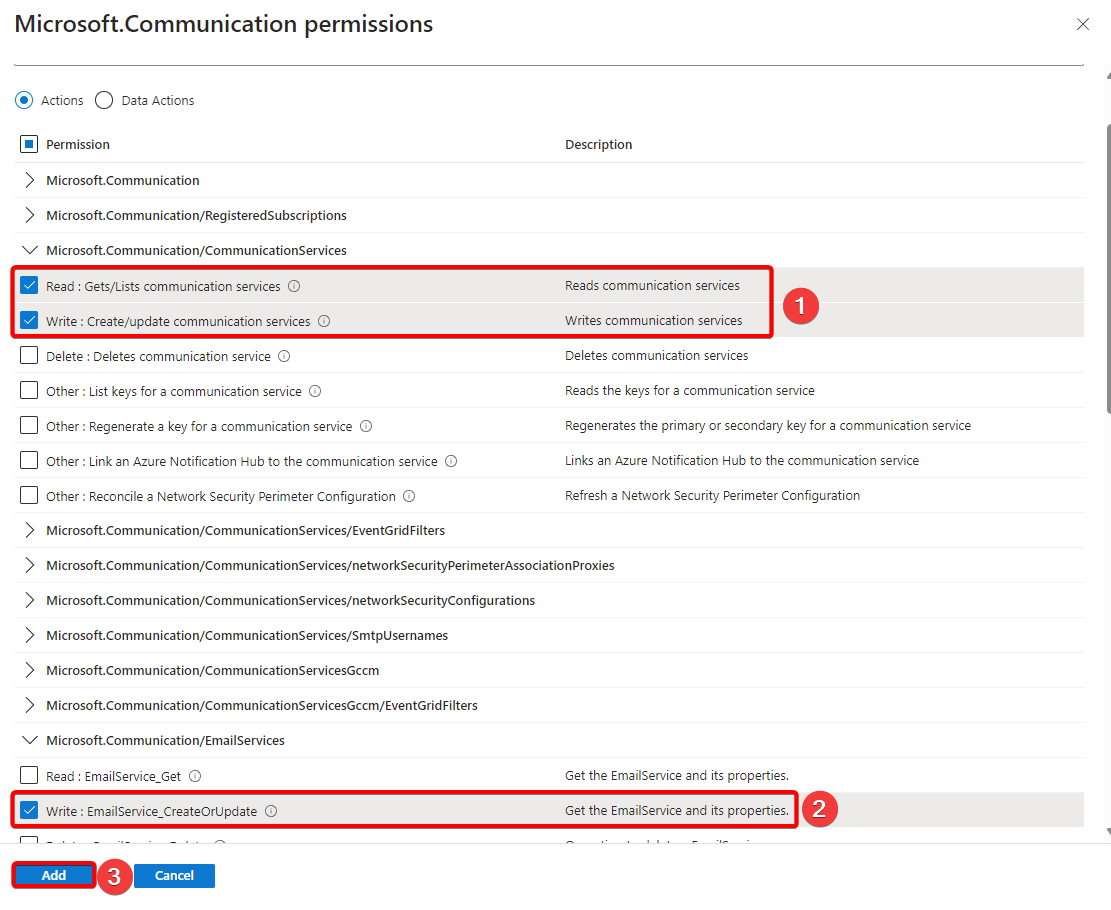
- Under the permissions section, select Add permissions and then select Azure Communication Services.
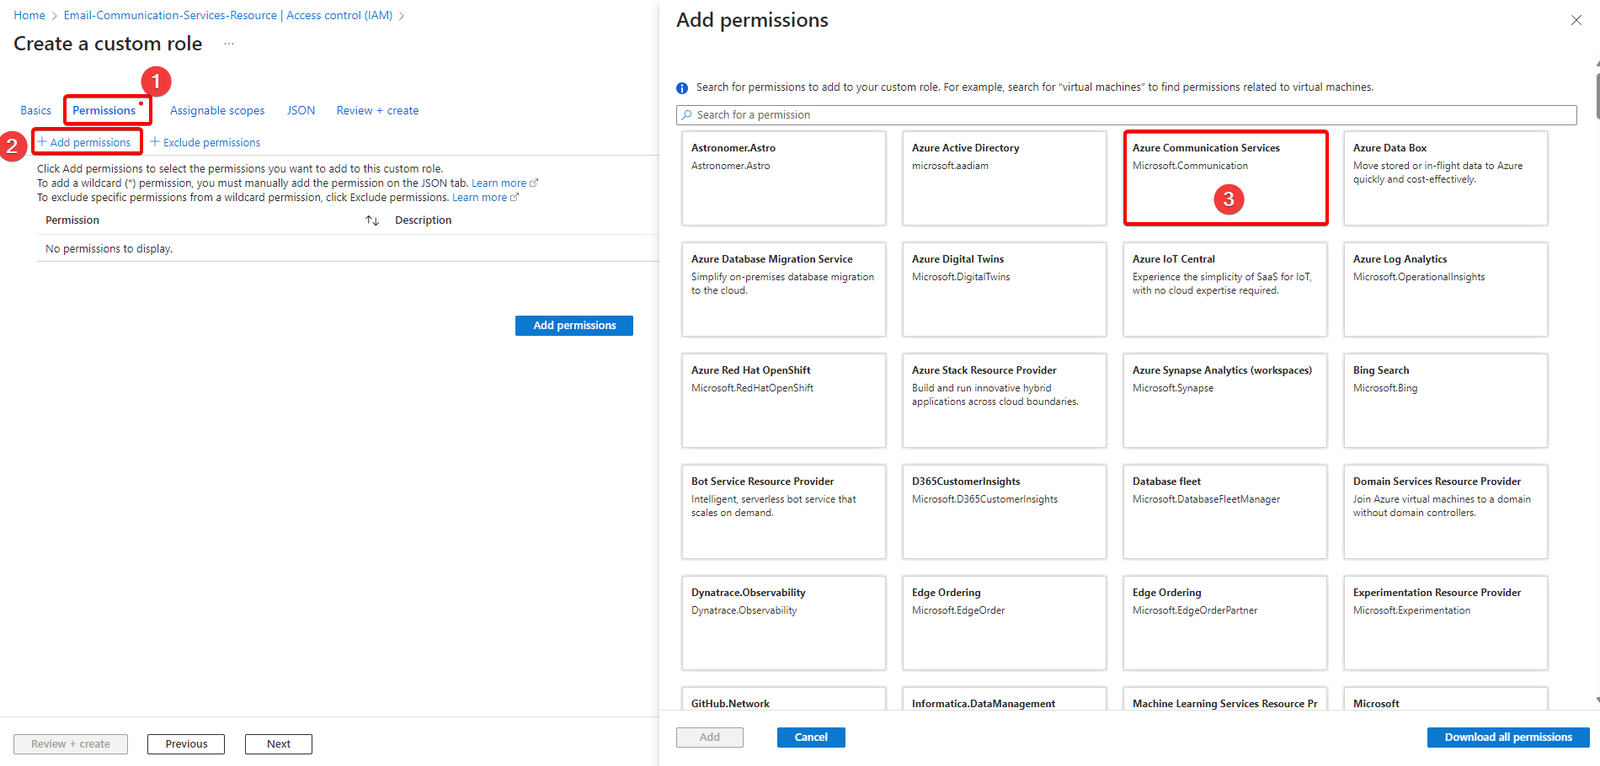
- Now select the Microsoft.Communication/CommunicationServices Read, Microsoft.Communication/CommunicationServices Write, and the Microsoft.Communication/EmailServices Write permissions and Click Add.
The final permissions should look like the permissions below, now select Review+Create and then select Create.
Assign the custom role to the Enterprise Application.
To assign the custom role to the Enterprise Application, please follow the below stpes.
- Navigate to https://portal.azure.com/
- Open the Azure Communication Service Instance.
- Select Access control (IAM) and then select Add role assignments under the Add section.
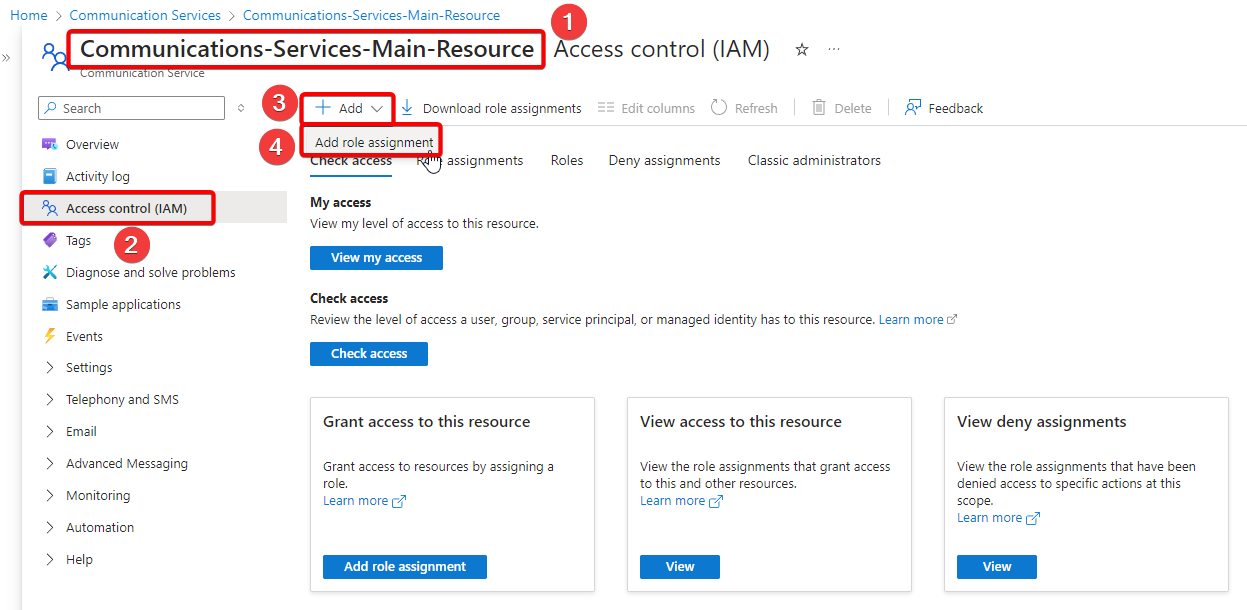
- Once the Add role assignment options page opens up, select Role section and then select job function roles and then type the name of the custom role in the search bar and select the role and then select next.

Under the Members tab, select User, group, or service principal and then click +Select members and type the enterprise application name (example: ECS-App-in-enterprise-applications) and select Review+Assign.

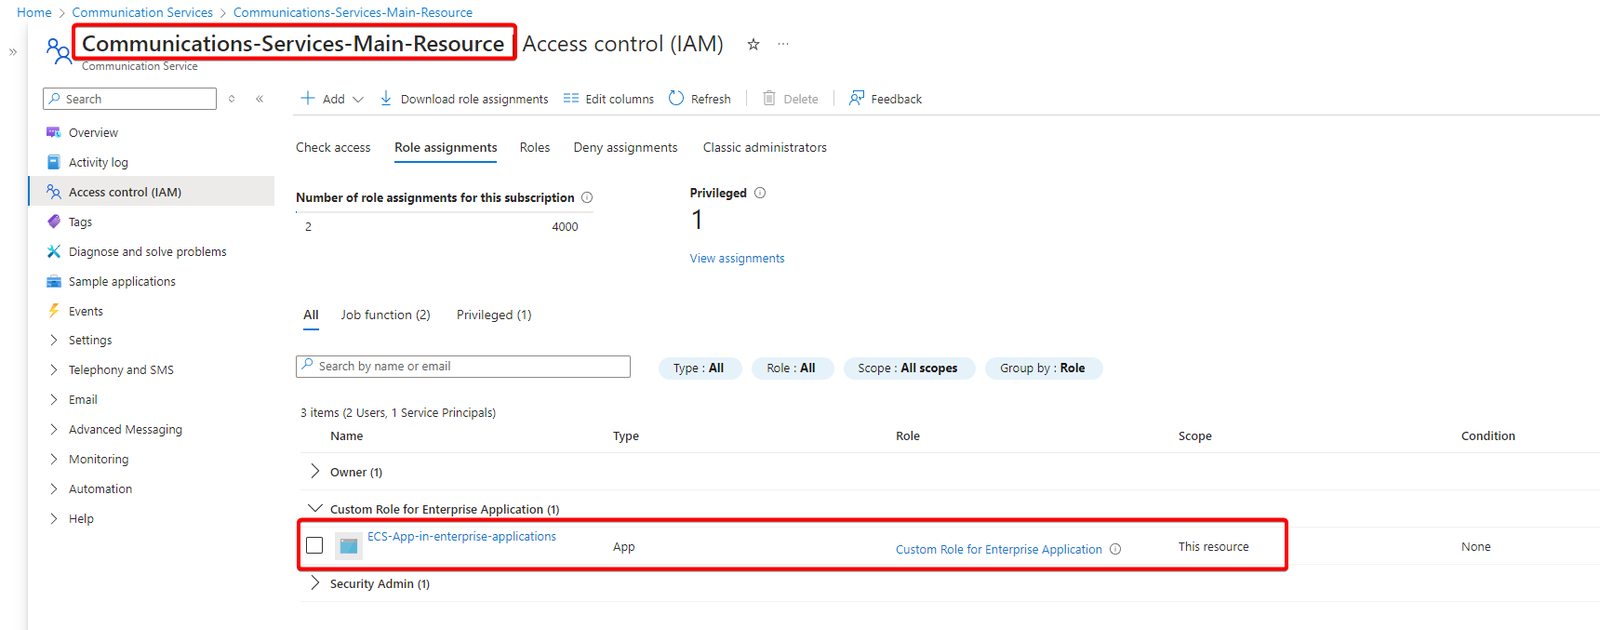
If we check the role assignment section under Access control (IAM) of the Email Communication Service resource, the Enterprise Application (named ECS-App-in-enterprise-applications) will now show up with the custom permission Custom Role (name Custom Role for Enterprise Application).
Creating Username and password for Multifunction Device.
username that will be used in the MFD or the inhouse application will be the combination of the Azure Communication Service Instance name AND Microsoft Entra Enterprise registered Application ID AND the Tenant ID. The delimiter would be | (pipe symbol ) or . (period symbol).

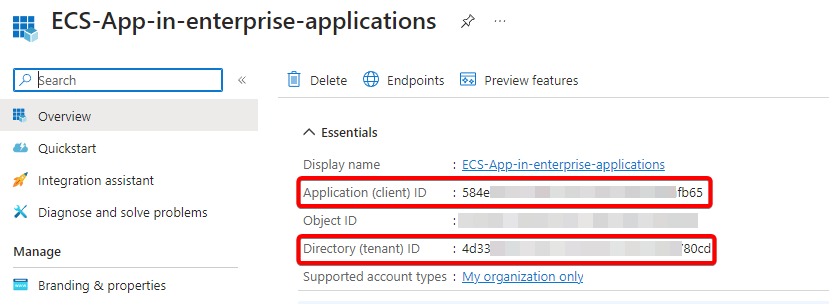
Example: Username would be “Communications-Services-Main-Resource.584exxxx-xxxx-xxxx-xxxx-xxxxxxxxfb65.4d33xxxx-xxxx-xxxx-xxxx-xxxxxxxx80cd” OR the username would be “Communications-Services-Main-Resource|584exxxx-xxxx-xxxx-xxxx-xxxxxxxxfb65|4d33xxxx-xxxx-xxxx-xxxx-xxxxxxxx80cd“.
The password that need to be used in the MFD or the inhouse application would be the Client Secret Value in the enterprise application.
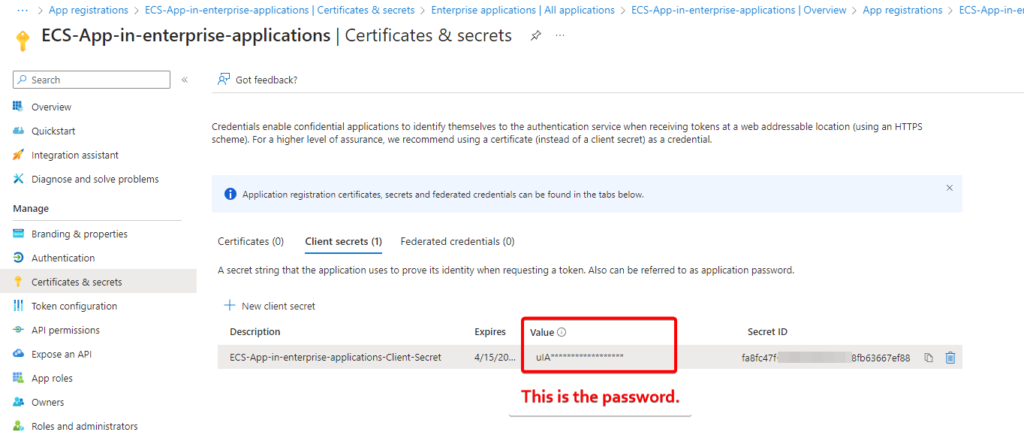
Note: Secret ID is not the password, if we use secret ID as the password then we will get the error in the sign in logs of the Enterprise Application. (Error: Invalid client secret provided. Ensure the secret being sent in the request is the client secret value, not the client secret ID, for a secret added to app ‘{identifier}’.).
Sending Test Email to check the configuration.
As all the configuration of Email Communication Service is completed, it is now time to send a test email.
PS C:\Users\ashutosh> $Password = ConvertTo-SecureString -AsPlainText -Force -String "uIA8xxxxxxxxxxxxxxxxxxxxxxxxxxxxxxxxHcmX"
PS C:\Users\ashutosh> $Cred = New-Object -TypeName PSCredential -ArgumentList "Communications-Services-Main-Resource.584exxxx-xxxx-xxxx-xxxx-xxxxxxxxfb65.4d33xxxx-xxxx-xxxx-xxxx-xxxxxxxx80cd", $Password
PS C:\Users\ashutosh> Send-MailMessage -From "donotreply@aashu.co.in" -To "aashu@aashu.co.in" -Subject "Test Email using Email Communication Services" -Body "Test email sent by PowerShell through Email Communication Services" -SmtpServer "smtp.azurecomm.net" -Port 587 -Credential $Cred -UseSsl
Below is how the email looks when it delivers to the recipients mailbox.

Conclusion.
Emails Communication Services in Azure is a great tool to send the emails internally and externally. The organization would not be able to send high volume of emails using ECS, first the limitation would be 2400 emails per day (100 emails per hour). Organization has to raise a service request with Azure support to get the email limit increased.